These rules apply whether we're talking about a single Wi-Fi router, a mesh kit like Eero, Plume, or Orbi, or a set of wire-backhauled access points like Ubiquiti's UAP-AC line or TP-Link's EAPs. Unfortunately, these "rules" are necessarily closer to "guidelines" as there are a lot of variables it's impossible to fully account for from an armchair a few thousand miles away. But if you become familiar with these rules, you should at least walk away with a better practical understanding of what to expect—and not expect—from your Wi-Fi gear and how to get the most out of it.
Before we get started
Let's go over one bit of RF theory (radio-frequency) before we get started on our ten rules—some of them will make much better sense if you understand how RF signal strength is measured and how it attenuates over distance and through obstacles.
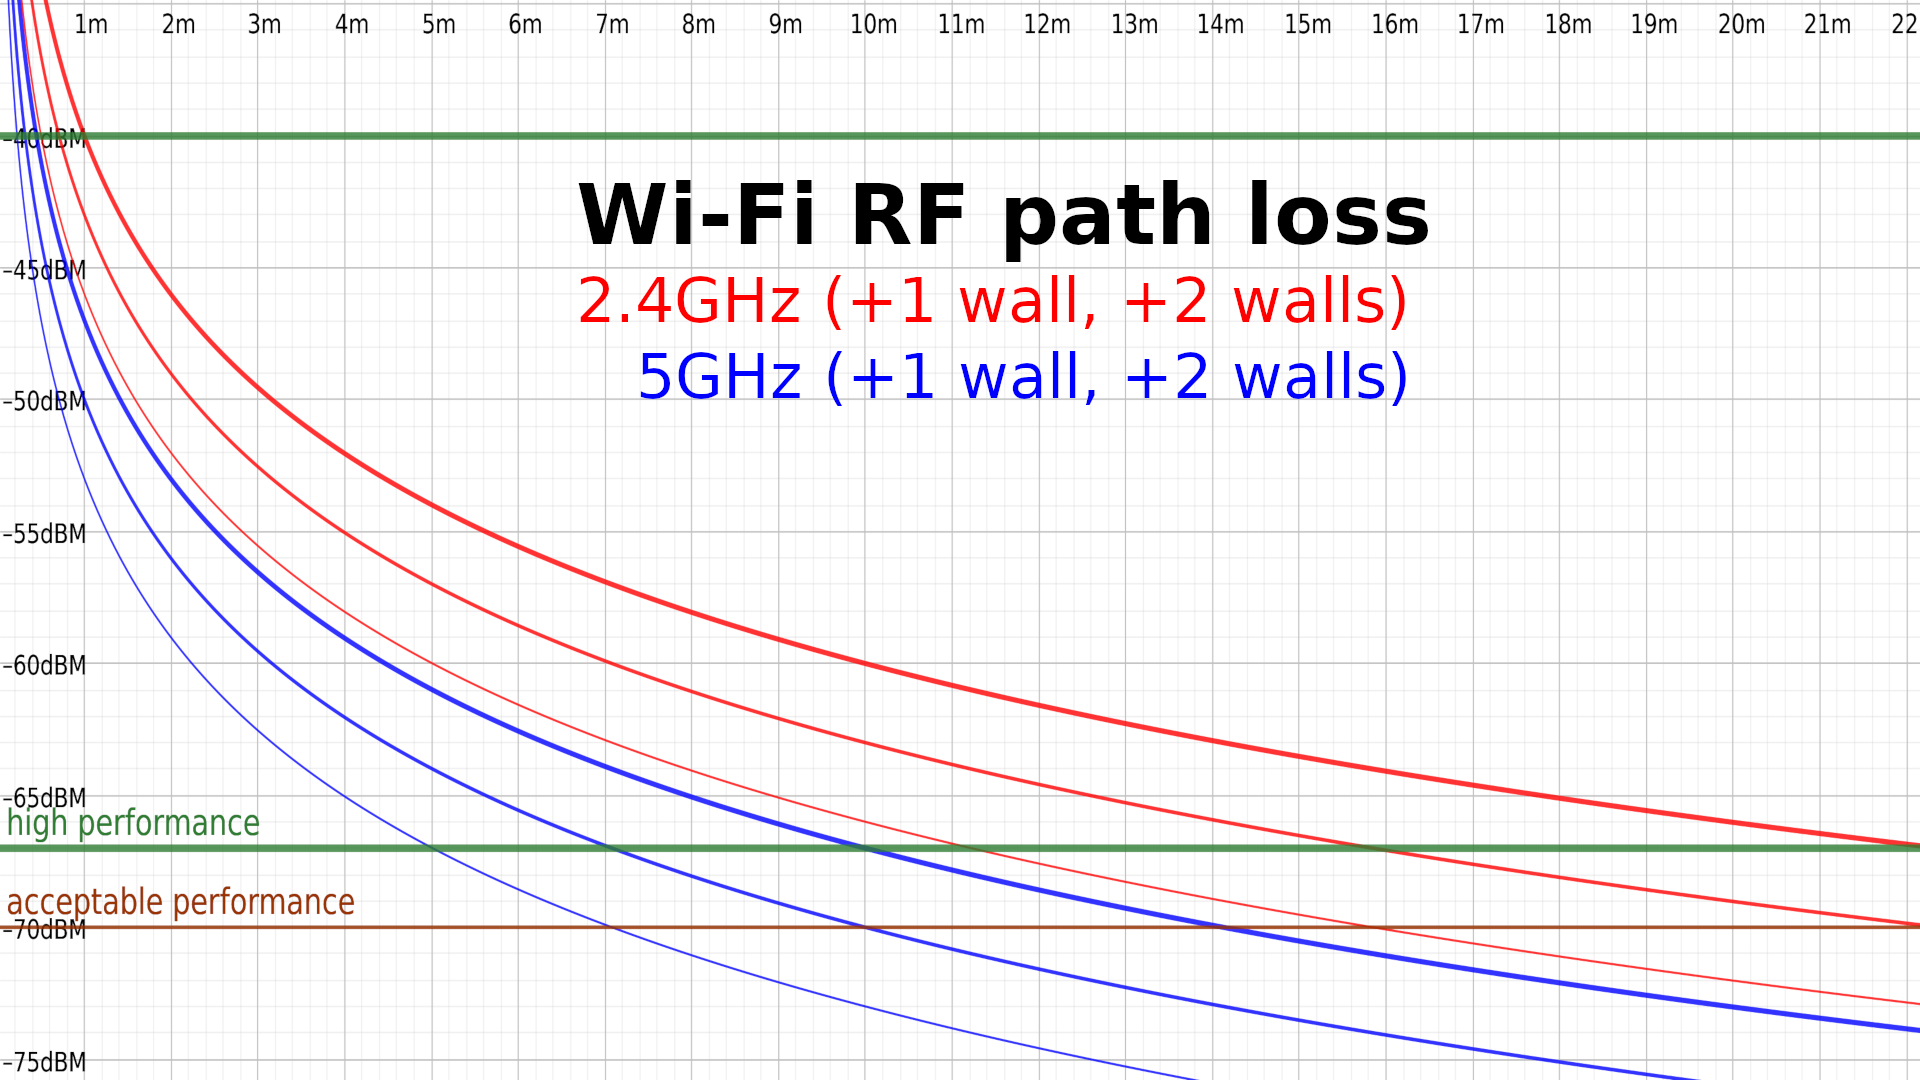
The above graph gives us some simple free space loss curves for Wi-Fi frequencies. The most important thing to understand here is what the units actually mean: dBm convert directly to milliwatts, but on a logarithmic base ten scale. For each 10dBm drop, the actual signal strength in milliwatts drops by a factor of ten. -10dBm is 0.1mW, -20dBm is 0.01mW, and so forth.
The logarithmic scale makes it possible to measure signal loss additively, rather than multiplicably. Each doubling of distance drops the signal by 6dBm, as we can clearly see when we look at the bold red 2.4GHz curve: at 1m distance, the signal is -40dBm; at 2m, it's -46dBm, and at 4m it's down to -52dBm.
Walls and other obstructions—including but not limited to human bodies, cabinets and furniture, and appliances—will attenuate the signal further. A good rule of thumb is -3dBm for each additional wall or other significant obstruction, which we'll talk more about later. You can see additional curves plotted above in finer lines for the same distances including one or two additional walls (or other obstacles).
While you should ideally have signal levels no lower than -67dBm, you shouldn't fret about trying to get them much higher than that—typically, there's no real performance difference between a blazing-hot -40dBm and a considerably-cooler -65dBm, as far away from one another on a chart as they may seem. There's a lot more going on with Wi-Fi than just raw signal strength; as long as you exceed that minimum, it doesn't really matter how much you exceed it by.
In fact, too hot of a signal can be as much of a problem as too cold—many a forum user has complained for pages about low speed test results, until finally some wise head asks "did you put your device right next to the access point? Move it a meter or two away, and try again." Sure enough, the "problem" resolves itself.
Rule 1: No more than two rooms and two walls
Our first rule for access point placement is no more than two rooms and two interior walls between access points and devices, if possible. This is a pretty fudge-y rule, because different rooms are shaped and sized differently, and different houses have different wall structures—but it's a good starting point, and it will serve you well in typically-sized houses and apartments with standard, reasonably modern sheet rock interior wall construction.
"Typically-sized," at least in most of the USA, means bedrooms about three or four meters per side and larger living areas up to five or six meters per side. If we take nine meters as the average linear distance covering "two rooms" in a straight line, and add in two interior walls at -3dBm apiece, our RF loss curve shows us that 2.4GHz signals are doing fantastic at -65dBm. 5GHz, not so much—if we need a full nine meters and two full walls, we're down to -72dBm at 5GHz. This is certainly enough to get a connection, but it's not great. In real life, a device at -72dBm on 5GHz will likely see around the same raw throughput as one at -65dBm on 2.4GHz—but the technically slower 2.4GHz connection will tend to be more reliable and exhibit consistently lower latency.
Of course, this all assumes that distance and attenuation are the only problems we face. Rural users—and suburban users with large yards—will likely have already noticed this difference and internalized the rule-of-thumb "2.4GHz is great, but man, 5GHz sucks." Urban users—or suburban folks in housing developments with postage-stamp yards—tend to have a different experience entirely, which we'll cover in Rule 2.
reader comments
266