A while ago, I put 16 GB of RAM into one of my computers. The computer is using a Foxconn P55MX motherboard with a Core i5 750. It’s old and could probably be replaced, but it still works for what I need.
Here’s the interesting part. This motherboard doesn’t officially support 16 GB of RAM. The specs on the page I linked indicate that it supports a maximum of 8 GB. It only has 2 slots, so I had a suspicion that 8 GB sticks just weren’t as common back when this motherboard first came out. I decided to try anyway. In a lot of cases, motherboards do support more RAM than the manufacturer officially claims to support.
I made sure the BIOS was completely updated (version 946F1P06) and put in my two 8 gig sticks. Then, I booted it up into my Ubuntu 16.04 install and everything worked perfectly. I decided that my theory about the motherboard actually supporting more RAM than the documentation claimed was correct and forgot about it. I enjoyed having all the extra RAM to work with and was happy that my gamble paid off.
Then, a few months later, I tried to boot into Windows 10. I mostly use this computer in Linux. I only occasionally need to boot into Windows to check something out. That’s when the fun really started.
When GRUB came up, I navigated to the Windows 10 menu choice and hit enter. The Windows boot screen briefly showed up, and then I was immediately greeted with a Blue Screen of Death.
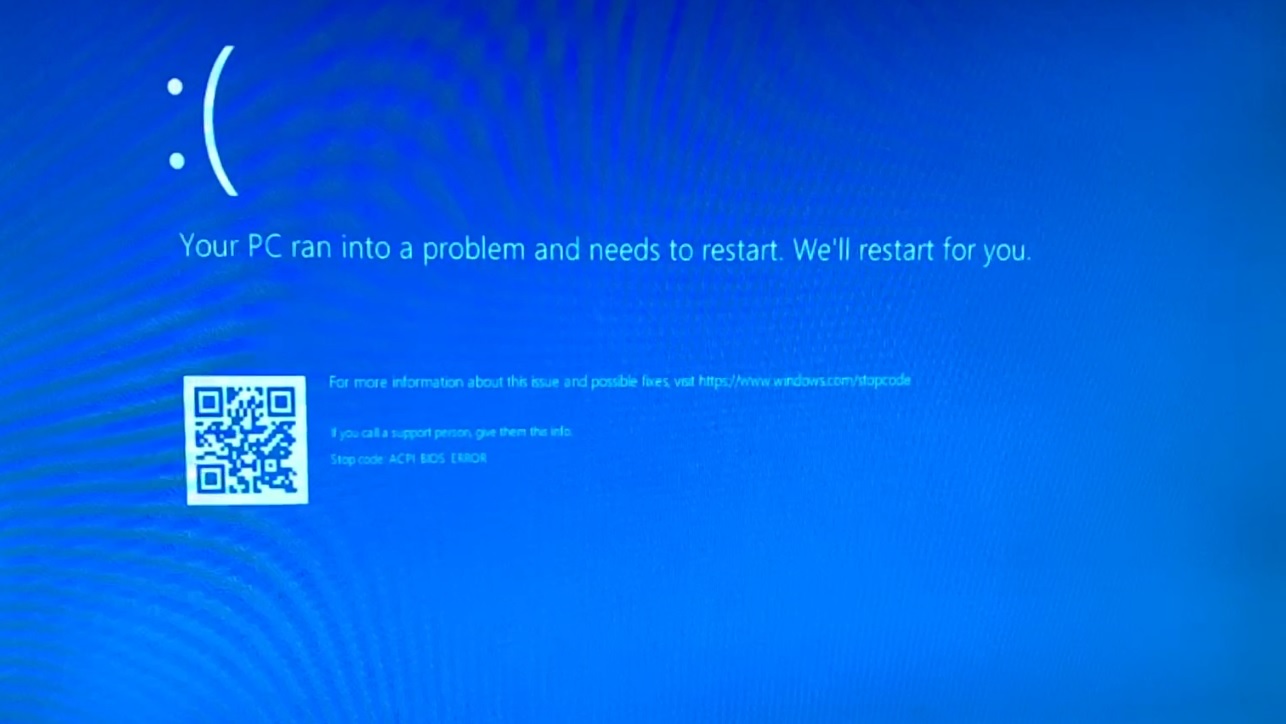
The stop code was: ACPI_BIOS_ERROR. I did a bunch of Googling, and basically the gist of the error is that something is wrong with the ACPI tables in my BIOS. The ACPI tables tell your operating system how to set up the hardware among other things. Trying to boot from a Windows install USB stick resulted in the same error. So I guess Foxconn wasn’t lying. This computer doesn’t support 16 GB of RAM. Dropping the RAM back down to 8 GB resulted in a successful boot. RAM tests passed just fine too, so it wasn’t a matter of bad RAM.
I tried contacting Foxconn support to ask about a potential BIOS fix, but didn’t receive a response. I found an email address on their website, and my message bounced. I don’t think Foxconn is in the motherboard business anymore. They don’t appear to provide support either.
An ordinary person would just give up at this point, and either stick with 8 gigs of RAM or get a new computer. I didn’t want to give up quite so easily. I knew that theoretically the computer could use 16 gigs, because it worked fine in Linux. So I started learning about ACPI and experimenting with my computer’s BIOS settings.
I found an interesting section in the BIOS where I could play with some memory settings. One of the settings was “Memory Remap Feature”. I had it enabled. The documentation in the BIOS said that the option allows the “overlapped PCI memory” to be remapped above the total physical memory. Some Googling indicates you should turn it on when booting into a 64-bit OS. On a whim, I tried disabling it, and Windows actually booted! However, it told me that less than 4 GB of my RAM was usable. But this was nice — I had a way to get into Windows without having to physically remove RAM.
Ubuntu was the same. It limited me to less than 4 GB with the Memory Remap Feature disabled. At this point I was pretty sure there was some kind of memory mapping issue going on. I decided to look more into the ACPI_BIOS_ERROR code and what causes it. I stumbled upon this excellent Microsoft driver debugging document that explains the ACPI_BIOS_ERROR bug check.
In order for the document to help me, I clearly needed to find the four error parameters that used to be displayed with the blue screen on older versions of Windows. Windows 10 hides all the information by default, but I discovered that it’s possible to re-enable display of the extra error information by adding an entry to your registry. Here’s the excellent answer on Super User that pointed me in the correct direction.
After applying the registry patch described in the linked answer, I re-enabled the Memory Remap Feature in my BIOS and booted Windows. The BSOD now showed four additional codes in the upper-left corner:
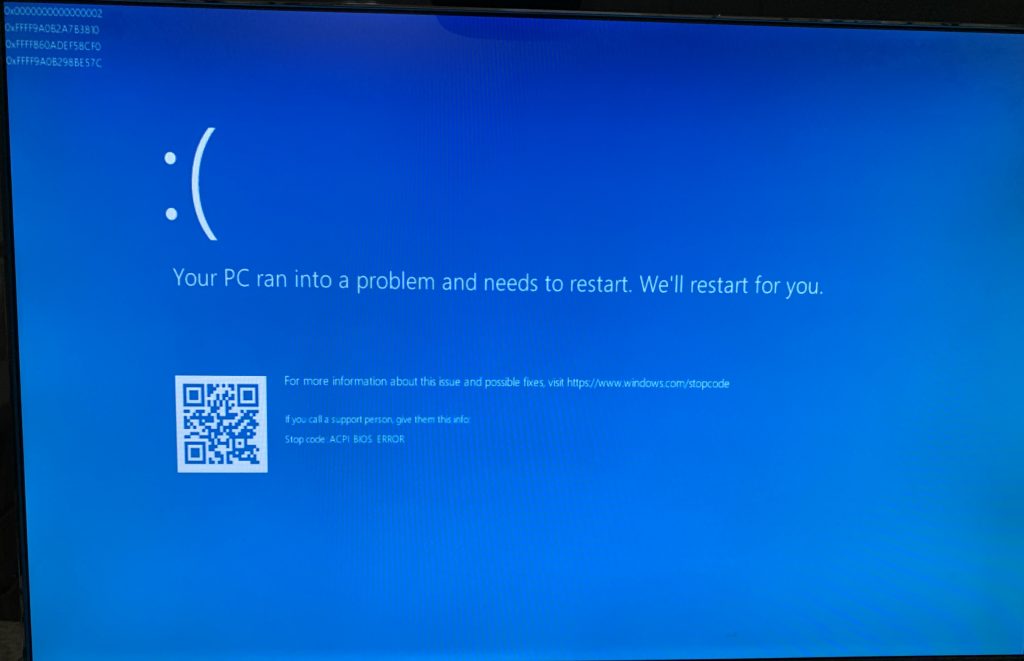
Perfect! So Parameter 1 is 0x0000000000000002. Looking at the Microsoft documentation, Parameter 1 being equal to 0x02 means there is a problem processing the resource list for the PCI root buses. Because Parameters 2, 3, and 4 all look like crazy values, they are probably pointers. And when they’re all pointers, Microsoft says the problem is that the PCI decode region overlaps with the list of memory regions returned by the BIOS E820 interface.
Okay. This information was a bit overwhelming, but it gave me something to start researching. I learned about how the E820 BIOS call provides information about memory regions. I went back to Linux and looked at all the kernel startup info using the dmesg command, paying extra special attention to E820 and ACPI stuff. Here’s what I found:
BIOS-e820: [mem 0x0000000000000000-0x000000000009ebff] usable
BIOS-e820: [mem 0x000000000009ec00-0x000000000009ffff] reserved
BIOS-e820: [mem 0x00000000000e0000-0x00000000000fffff] reserved
BIOS-e820: [mem 0x0000000000100000-0x00000000cf77ffff] usable
BIOS-e820: [mem 0x00000000cf780000-0x00000000cf78dfff] ACPI data
BIOS-e820: [mem 0x00000000cf78e000-0x00000000cf7cffff] ACPI NVS
BIOS-e820: [mem 0x00000000cf7d0000-0x00000000cf7dffff] reserved
BIOS-e820: [mem 0x00000000cf7ed000-0x00000000cfffffff] reserved
BIOS-e820: [mem 0x00000000fee00000-0x00000000fee00fff] reserved
BIOS-e820: [mem 0x00000000ffb00000-0x00000000ffffffff] reserved
BIOS-e820: [mem 0x0000000100000000-0x000000042fffffff] usable
Later on, I saw this:
acpi PNP0A08:00: ignoring host bridge window [mem 0x400000000-0xfffffffff
window] (conflicts with System RAM [mem 0x100000000-0x42fffffff])
PCI host bridge to bus 0000:00
pci_bus 0000:00: root bus resource [io  0x0000-0x0cf7 window]
pci_bus 0000:00: root bus resource [io  0x0d00-0xffff window]
pci_bus 0000:00: root bus resource [mem 0x000a0000-0x000bffff window]
pci_bus 0000:00: root bus resource [mem 0x000d0000-0x000dffff window]
pci_bus 0000:00: root bus resource [mem 0xd0000000-0xdfffffff window]
pci_bus 0000:00: root bus resource [mem 0xf0000000-0xfed8ffff window]
pci_bus 0000:00: root bus resource [bus 00-ff]
Aha! See that warning about the conflict? I hadn’t noticed it, but Linux had started printing that message at every boot after I installed the RAM. I tried booting into Linux with the Memory Remap Feature turned off in my BIOS. In that case, the last e820 region from 0x100000000 to 0x42fffffff was no longer present, and thus the conflict message also disappeared and the host bridge window from 0x400000000 to 0xfffffffff showed up as another “root bus resource” in the list.
So there’s my answer. The reason Linux works with 16 GB is because it notices the conflict and ignores the conflicting PCI range that ACPI provides, whereas Windows throws up its hands in disgust and pukes out a blue screen that says, “your BIOS has a problem!” I can’t blame Windows. There is definitely an overlap, so it makes sense that it gets confused.
At this point I wasn’t sure if I should keep going. The last 768 MB chunk of my RAM from 0x400000000 to 0x42fffffff was mapped to the start of a huge area of the memory space that my motherboard uses for PCI stuff. Clearly if the motherboard is expecting PCI stuff to be there, something really bad could happen. So my motherboard only supports a total of 15.25 GB of RAM, and that’s that. Right?
But…Linux was working just fine without that extra PCI mapping area enabled! What if I could somehow modify the ACPI tables so that the big PCI range starts at 0x430000000 instead of 0x400000000? That would be just after the end of my RAM, so there would no longer be a conflict, and most of the PCI mapping window would still be available.
Challenge accepted.
I started digging into the ACPI tables. Luckily, Linux makes it really easy to dump them. There are tools out there, but you can also easily find the tables in sysfs:
/sys/firmware/acpi/tables
There they all are. I was also excited because I discovered that GRUB has the ability to replace your ACPI tables with new versions. So if I could figure out which table was involved, I could install a new version of that table using GRUB and theoretically Windows would be happy.
I used iasl, among other tools, to try to disassemble the different ACPI tables and find the 0x400000000 value so I could change it. Remembering that the value is probably little-endian, and it’s also probably 64 bits wide, I used binwalk to search through all the table files:
binwalk -R '\x00\x00\x00\x00\x04\x00\x00\x00' *
I found one result in the OEMB table. The next 64-bit word after it was 0x1000000000, which just so happens to be one more than the end address in the host bridge window conflict message. This looked like a very promising lead. The OEMB table is special because it doesn’t appear to be a standard table according to the ACPI specifications. Linux also complains that its checksum is invalid, but I don’t think it matters. I’m assuming you can guess what I did next…
I made a copy of the OEMB table, replacing the 0x00 byte directly before the 0x04 byte with 0x30 in order to change the value to 0x430000000 (remember, it’s little-endian). I put this modified copy in a file called /boot/oemb.dat in Linux. Then, I used GRUB to replace the OEMB table with my copy by temporarily inserting the following command into the boot command list (by typing the letter ‘e’ in GRUB with Ubuntu selected):
acpi --exclude=OEMB /boot/oemb.dat
The idea here is that it tells GRUB to load all ACPI tables except the OEMB table, and then tells it to load the content of /boot/oemb.dat and add it as an additional table. This will effectively replace the old OEMB table with my new OEMB table.
Okay, I booted up Linux…and…
acpi PNP0A08:00: ignoring host bridge window [mem 0x400000000-0xfffffffff
window] (conflicts with System RAM [mem 0x100000000-0x42fffffff])
That damned error was still there. WTF? I guessed that maybe the PCI range was actually determined somewhere else, but I didn’t see anywhere else that particular value was defined. I verified that my patched OEMB table was indeed loaded, and went back to the drawing board.
This time, I decided to use iasl to decompile the DSDT table. Some sleuthing indicated that the DSDT table was going to contain a method called “_CRS” that is responsible for creating this table.
iasl -d DSDT
I found the _CRS method associated with the PCI bus in the resulting .dsl file, and it looked pretty complicated. The DSDT table contains actual code, so it’s not necessarily possible to simply search for table values. In my case, the _CRS method was fairly complex. I interpreted the code as best as I could. It led me to realize that the _CRS method was loading information from a different table in memory, starting at 0xCF78E064. I looked at my Linux dmesg boot log again, and found this:
ACPI: Early table checksum verification disabled
ACPI: RSDP 0x00000000000F9820 000014 (v00 ACPIAM)
ACPI: RSDT 0x00000000CF780000 000044 (v01 012110 RSDT0821 20100121 MSFT 00000097)
ACPI: FACP 0x00000000CF780200 000084 (v01 012110 FACP0821 20100121 MSFT 00000097)
ACPI: DSDT 0x00000000CF780460 006FE7 (v01 946F1  946F1P06 00000000 INTL 20051117)
ACPI: FACS 0x00000000CF78E000 000040
ACPI: APIC 0x00000000CF780390 00008C (v01 012110 APIC0821 20100121 MSFT 00000097)
ACPI: MCFG 0x00000000CF780420 00003C (v01 012110 OEMMCFG  20100121 MSFT 00000097)
ACPI: OEMB 0x00000000CF78E040 000082 (v01 012110 OEMB0821 20100121 MSFT 00000097)
ACPI: HPET 0x00000000CF78A460 000038 (v01 012110 OEMHPET  20100121 MSFT 00000097)
ACPI: GSCI 0x00000000CF78E0D0 002024 (v01 012110 GMCHSCI  20100121 MSFT 00000097)
ACPI: DMAR 0x00000000CF790100 000090 (v01 AMI    OEMDMAR  00000001 MSFT 00000097)
ACPI: SSDT 0x00000000CF7917C0 000363 (v01 DpgPmm CpuPm    00000012 INTL 20051117)
Aha! It’s loading the information from the OEMB table. My hunch had been correct all along. So why didn’t replacing the OEMB table work?
I looked again at my dmesg log after replacing the OEMB table. What I hadn’t realized was that GRUB relocates most of the tables, including OEMB, to a different area in memory if you try to modify them. The problem is that the DSDT table is hardcoded to look at 0xCF78E064 for things it needs to read out of the OEMB table. It assumes that’s where the OEMB table is loaded. So it wasn’t looking at my new modified table — it was still looking at the original table. Ugh.
My first inclination was to modify the DSDT to look at the new OEMB table location, but I felt like that was a bad idea for the future because new versions of GRUB might change the location of where the custom OEMB table is stored in memory.
I settled on a different idea. GRUB has commands called write_byte, write_word, write_dword, and the read_ equivalents of them all. What if I used GRUB to modify the original OEMB table in place? BIOSes these days are compressed. The tables are probably loaded into RAM, so theoretically I should be able to modify the table values.
So I did. I added the following command to my GRUB boot sequence as a temporary test:
write_byte 0xCF78E0B5 0x30
This replaced the 0x00 byte just before the 0x04 byte with 0x30, transforming the 64-bit PCI start address of that final range into 0x0000000430000000. I didn’t bother updating the OEMB table’s checksum, because Linux was already whining to me that the checksum was incorrect, so it obviously didn’t care.
I rebooted into Linux, and anxiously checked my dmesg log for the PCI stuff.
PCI host bridge to bus 0000:00
pci_bus 0000:00: root bus resource [io  0x0000-0x0cf7 window]
pci_bus 0000:00: root bus resource [io  0x0d00-0xffff window]
pci_bus 0000:00: root bus resource [mem 0x000a0000-0x000bffff window]
pci_bus 0000:00: root bus resource [mem 0x000d0000-0x000dffff window]
pci_bus 0000:00: root bus resource [mem 0xd0000000-0xdfffffff window]
pci_bus 0000:00: root bus resource [mem 0xf0000000-0xfed8ffff window]
pci_bus 0000:00: root bus resource [mem 0x430000000-0xfffffffff window]
pci_bus 0000:00: root bus resource [bus 00-ff]
Success! The 0x430000000-0xfffffffff window appeared as a new valid window in the list, and the conflict warning was gone. After verifying that Linux still worked fine, I tried booting into Windows with the same hack.
It worked! I am now able to boot into Windows with 16 GB of RAM installed in my computer, as long as I use GRUB as my bootloader with the write_byte command above. The stock Windows 10 bootloader obviously won’t work, and if I ever reinstall Windows I’ll probably have to temporarily yank out half of my RAM so that the installer will boot. But it works!
To permanently add the fix to GRUB, I created a file called /etc/grub.d/00_patchbios containing the following:
# This file patches the BIOS in my Foxconn P55MX motherboard to work
# properly when I have 16 GB of RAM installed. It's a nasty hack.
# Basically, the BIOS is hardcoded in the OEMB ACPI table
# to have a PCI address range from 0x400000000 to 0xfffffffff, but
# that overlaps with 16 GB of RAM being installed, because the RAM
# uses up (among other ranges) 0x100000000 to 0x42fffffff.
# This patch changes the table to actually list a PCI range of:
# 0x430000000 to 0xfffffffff
echo "write_byte 0xCF78E0B5 0x30"
Then, I made sure to chmod +x it, and ran sudo update-grub. Now the patch is automatically applied when GRUB starts up.
I honestly don’t know how safe this is. I don’t know if the motherboard is actually hardwired to look at those addresses for PCI stuff or what. All I know is it passes my RAM tests. Since Linux has been working fine with the 16 gigs of RAM installed, I am not too worried. It’s possible I would have problems if I had more PCI/PCIe cards installed or something, but in my use case, it seems to behave fine. Obviously, your mileage may vary, and this hack isn’t going to directly work on other motherboards because every BIOS’s ACPI table is going to be a little bit different.
I thought this was a fun learning experience to share with the world! I hope you learned something from reading this post. I sure learned a lot just from the process of figuring this all out.


This is the best blogpost I have seen in 2019!
This is freakin awesome. The T430 only allows 16GB of ram, so I’m wondering if this will allow me to upgrade my ram to 32GB using this method.
Ahh man, now there needs to be a GitHub page to automate this process.
Great stuff Doug! “My hunch had been correct all along” – is a great feeling!
Only minor note towards the end of the post: if you use GRUB to boot a Windows install medium you technically wouldn’t need to worry about it when re-installing / installing Windows either right? Of course if you use the boot mediums boot loader it won’t work.
This is super cool. Great read! Like the other comment, top post from 2019!
In this case, part of the problem is that 4Gbit DDR3 was not common in 2009-2010 and this mobo has only two slots.
I loved the article! Will definitely start following the blog!
It was very fun reading through.
Great writing, I really enjoyed the read!
Would it be possible to artificially fill all your RAM and then see how your PCI/PCIE cards behave (and IF they behave)?
Great article,look forward to more!
Really good article. Found it in my Google feed.
[…] Then, a few months later, I tried to boot into Windows 10. I mostly use this computer in Linux. I only occasionally need to boot into Windows to check something out. That’s when the fun really started. […]
Not bad for a night’s work.
Fan fkink tastic
I have this motherboard and will try to this. By the way, you are on top of Hacker News right now.
VERY educational! Thank you for sharing this experience.
@Sean unfortunately it won’t -T430 is limited by physical wiring of its cpu – the real limit is that it requires dual-rank 16GB SO-DIMM, which are very rare, and it *won’t* work with single rank 16GB because intel broke that in hw
Very nice bit of sleuthing. And such patience.
Why the hell would you not just go buy a new mobo. If you’re smart enough to figure out how to rewrite the bios to support 15gb of ram you’re smart enough to get a job to pay for it.
Because he can?
I wonder why this 4Gbit DDR3 chip never caught on:
https://www.samsung.com/semiconductor/insights/news-events/samsung-develops-worlds-highest-density-dram-chip-low-power-4gb-ddr3/
Hey, I really really love this blog post. can I translate it into Chinese and post it here: https://zhuanlan.zhihu.com/auxten
That’s a freaking good article! Thank you for sharing this adventure.
Great writeup!
Really cool! Awesome work!
This was an awesome writeup. I felt like I was on the adventure with you.
Infact, this is the sort of thing I’m prone to do.
I’ve never bothered to write it up. I think you are the bit of inspiration that I need to prod me next time I do something like this.
Thanks again. Awesome !
Thank you all for your kind comments! I’m glad you enjoyed my story! Makes me happy that I went through the effort of writing this post!
@John You’re probably right, although it would take a bit of effort to figure out how to get GRUB to boot from the Windows install medium, and the Windows install process will reboot the computer a few times. Probably easier just to temporarily remove the RAM.
@genbyte I just realized I only have one PCI card installed. It’s my graphics card. Of course there are other PCI devices such as the internal audio and Ethernet chipsets. I ran a test with a Windows program called memtest to test as much RAM as possible while booted into Windows and everything seems fine…
@auxten That is fine with me. Please make sure to link to my blog and clearly state that your post is a translation of my post. Thanks!
Great job! love it.
Came here from Digg. Fantastic read showing great perseverance and skill. Must have been rewarding when you cracked it!
Maybe GRUB’s BADRAM could also work to ignore the overlapped region:
https://help.ubuntu.com/community/BadRAM
https://askubuntu.com/a/908928
Why not binary-edit this into the BIOS ?:)
Awesome! Thank you for sharing your adventure with the world. You set a high bar for the rest of us to follow. This will be the year of digging deeper into technology problems because we can.
Post about this over on the my digital life forum. Might be someone there who could modify the BIOS so this board would directly support 16 gig with no GRUB monkey business.
This could be possible with many boards where the RAM limit isn’t directly hobbled in the chipset or by the CPUs it supports.
Nice, now if you can crack the memspace on an 2012 macbook pro, i maybe able to breach 16gb!
Like playing with upper memory just like we used to prior windows stopping the old DOS files from running.
Used to map space to fit more apps and free up for usage.
Reading this took me back 20 years and nice to see you got a way to make it work.
Hi, wonder if this would work on an old Toshiba laptop? 8GB DDR3 aren’t that expensive and in principle it should also work. In my case I want to use it under Ubuntu for inference work with a quad core 2.4 GHz CPU so even 12Gb would be useful (8+4GB) if the full 16GB won’t work.
Fascinating article!
Did you go on the Feedback Hub and propose that MS modify their bootloader so that Windows handles the extra RAM as gracefully/flexibly as Linux does?
Hi Doug,
Thanks for you highly technical posts.
As I’ve never got any chance to even boot with 8 GB sticks on x55 motherboards, can you specify the exact memory sticks references you used please ?
Thank you !
@Olivier These are the sticks I bought: https://www.newegg.com/Product/Product.aspx?Item=N82E16820231607
@JesusDF Interesting, but I don’t think it’s necessary — all my RAM works fine. I think I’m lucky because none of my PCI devices get mapped into that huge region at the end. I also tried a similar thing with Windows when I was first troubleshooting (telling it the amount of RAM it was allowed to use) and that didn’t fix the issue until I did the ACPI stuff.
@Monoton I actually thought about it, haha. Unfortunately the BIOS is compressed so it’s not as simple as tweaking just a single byte. But theoretically, yes, I could decompress, edit the table, recompress, and flash the new BIOS to make the hack really permanent.
@Victor I honestly don’t have a problem with how Windows handled the situation. It’s kind of an unusual scenario, and depending on the PCI cards I have installed, it could have caused a pretty nasty conflict. I don’t really think of it as being an issue with Windows. (Although it was really cool that Linux still booted and gave me enough info to figure it out)
I came here from digg.com , your article is worth sharing.
Keep up the good work.
Fascinating read, thanks for sharing the details!
You can directly ask windows bootloader to not use high mem region. Just man bootmgr set maxmem .
See docs.microsoft.com/en-us/windows-hardware/drivers/devtest/boot-parameters-to-manipulate-memory
@dUkk If this is the same as the “Maximum memory” in the advanced boot options of the startup tab of msconfig, then I already tried that, and the blue screen persisted. The “truncatememory” option at the site you linked definitely looks interesting, though, and I didn’t try that.
This is the place where you can contribute to save the environment .. maximize your old hardware to the max !!! Great post.
[…] Yoooooo this is too lit! https://www.downtowndougbrown.com/2019/04/adventures-of-putting-16-gb-of-ram-in-a-motherboard-that-d… […]
I have received hope
I’ve honestly never heard of the OEMB table, though I have done some limited study of PC hardware standards years ago. Correct me if I’m wrong, but from the little which I know, this hack seems very unsafe.
E820 tables, ACPI tables, etc. are provided to inform the OS of how the hardware is designed to work. Overwriting those tables can trick the OS into thinking that your hardware setup is different than what it really is, but it won’t change what the hardware actually does.
I’m just trying to imagine what would likely happen if you actually had some PCI device using that range of physical addresses, and meanwhile your RAM controller was also using them for your extra, unsupported 8GB of RAM.
My guess is that when the CPU attempted to read from one of those addresses, *both* the RAM controller and other HW device using the same physical address would try to respond. If you have one digital device trying to pull a line high while another tries to pull it low, you get a lot of current flow and things can burn out.
Someone who knows more about PC HW than me can probably correct this.
Hi Alex,
There’s a very good chance it’s unsafe. It seemed to work for me, and passed all memory tests I threw at it, but I agree there could be a possibility of contention between PCI and RAM if a PCI device tried to use the same address space. It’s been a while, but I believe I looked at the PCI addresses in use and there was no overlap, which could very well be due to dumb luck. One thing that I think would be interesting to learn is where those ranges actually get configured on the motherboard. I tend to think that those address ranges may actually be programmable in the chipset (done by the BIOS) rather than hardwired onto the board, but your point still stands that overwriting the table likely doesn’t reprogram the chipset to know the new reduced PCI range I’m wanting to use. If I ever wanted to add another PCIe card to the computer, I would definitely proceed with caution…
The OEMB table is likely specific to my particular motherboard vendor (or at least the BIOS vendor). Some quick Googling indicates that tables beginning with “OEM” are reserved for OEM use (the link applies to ARM64, but still seems relevant).
[…] Doug isn’t sure this is safe but it makes his system work ok. Read more in the blog post here. […]