
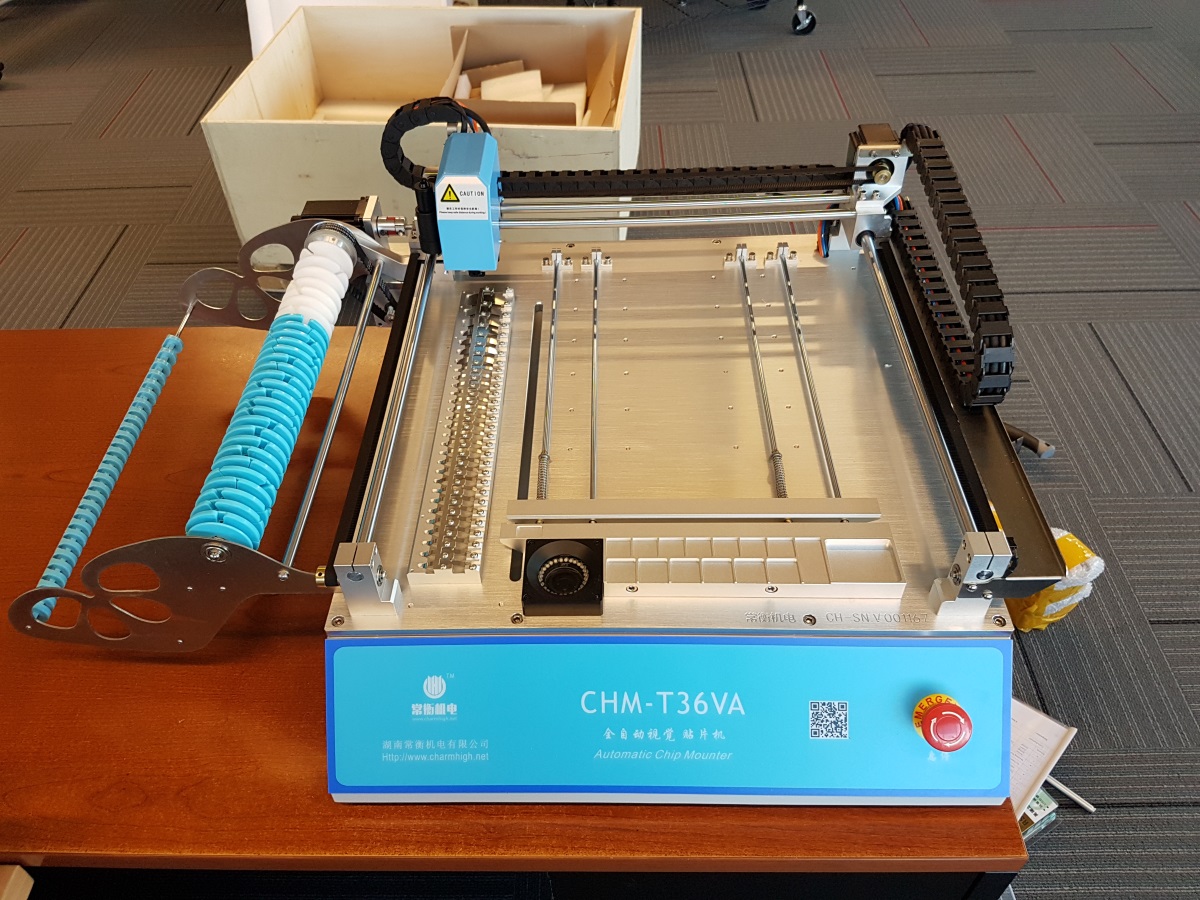
In late 2017 we ordered and received the CHMT36VA from Charm High. The cost was $2800 with a $640 DHL shipping charge. That’s an incredibly cheap price for a pick and place machine! The company was surprisingly responsive and quick to ship. We sent the wire on a Tuesday and were uncrating the machine the following Tuesday.

It took only a week! This was wonderfully fast for such a large piece of equipment.
This machine is cheap meaning you’re going to have to put up with quirks, problems, and very little support. Our MyChronic is way faster and far better behaved but it should be: it costs in the neighborhood of $250,000.
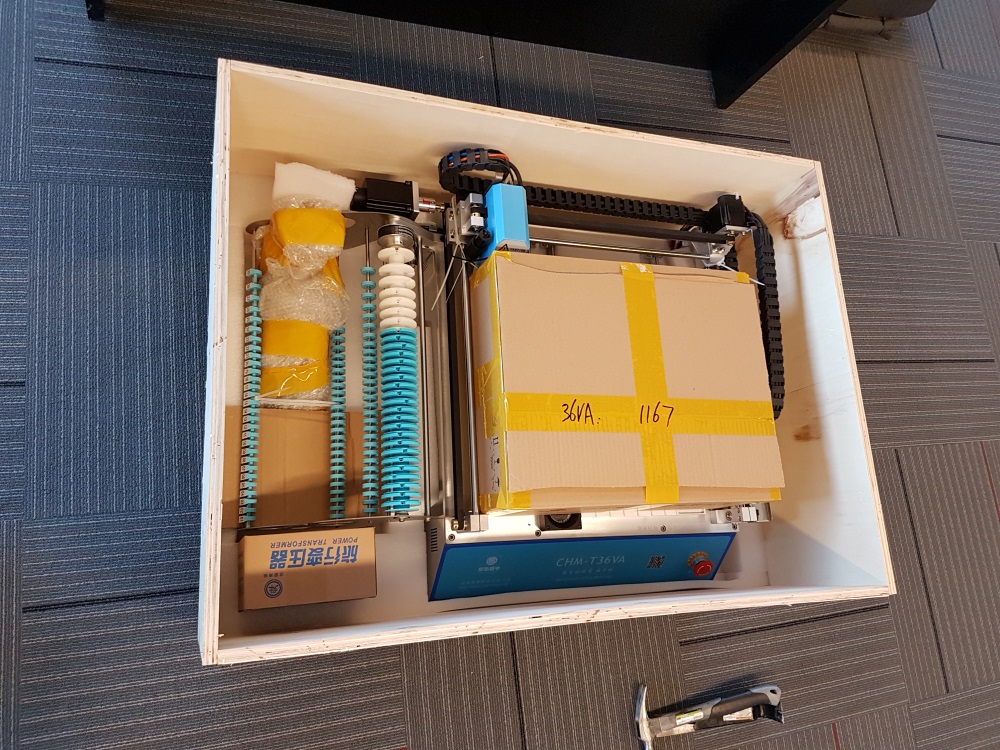
The machine arrived well packed and in good order.
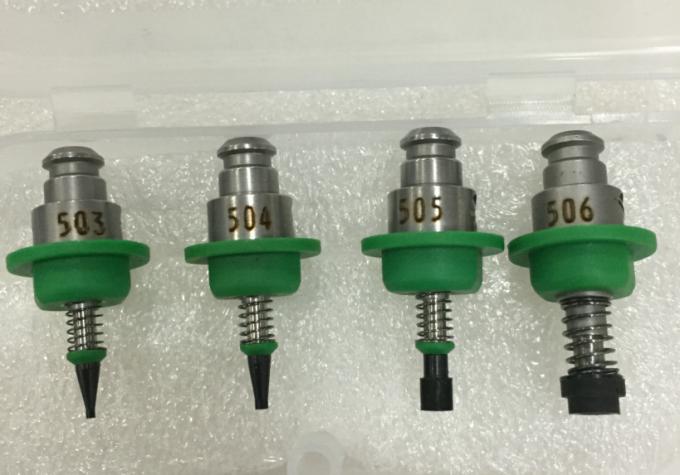
The machine included four Juki nozzles that manually insert into the two heads on the machine. It's pretty easy to swap out nozzles but we've installed the size 503 and 504 nozzles that have worked well for all our needs so far (0603, SOT, SOIC-14, 7x7 QFN, etc).
A quick inspection showed one loose screw on the cover of the encoder. This could have been a disaster. Check everything before powering up a new piece of equipment.
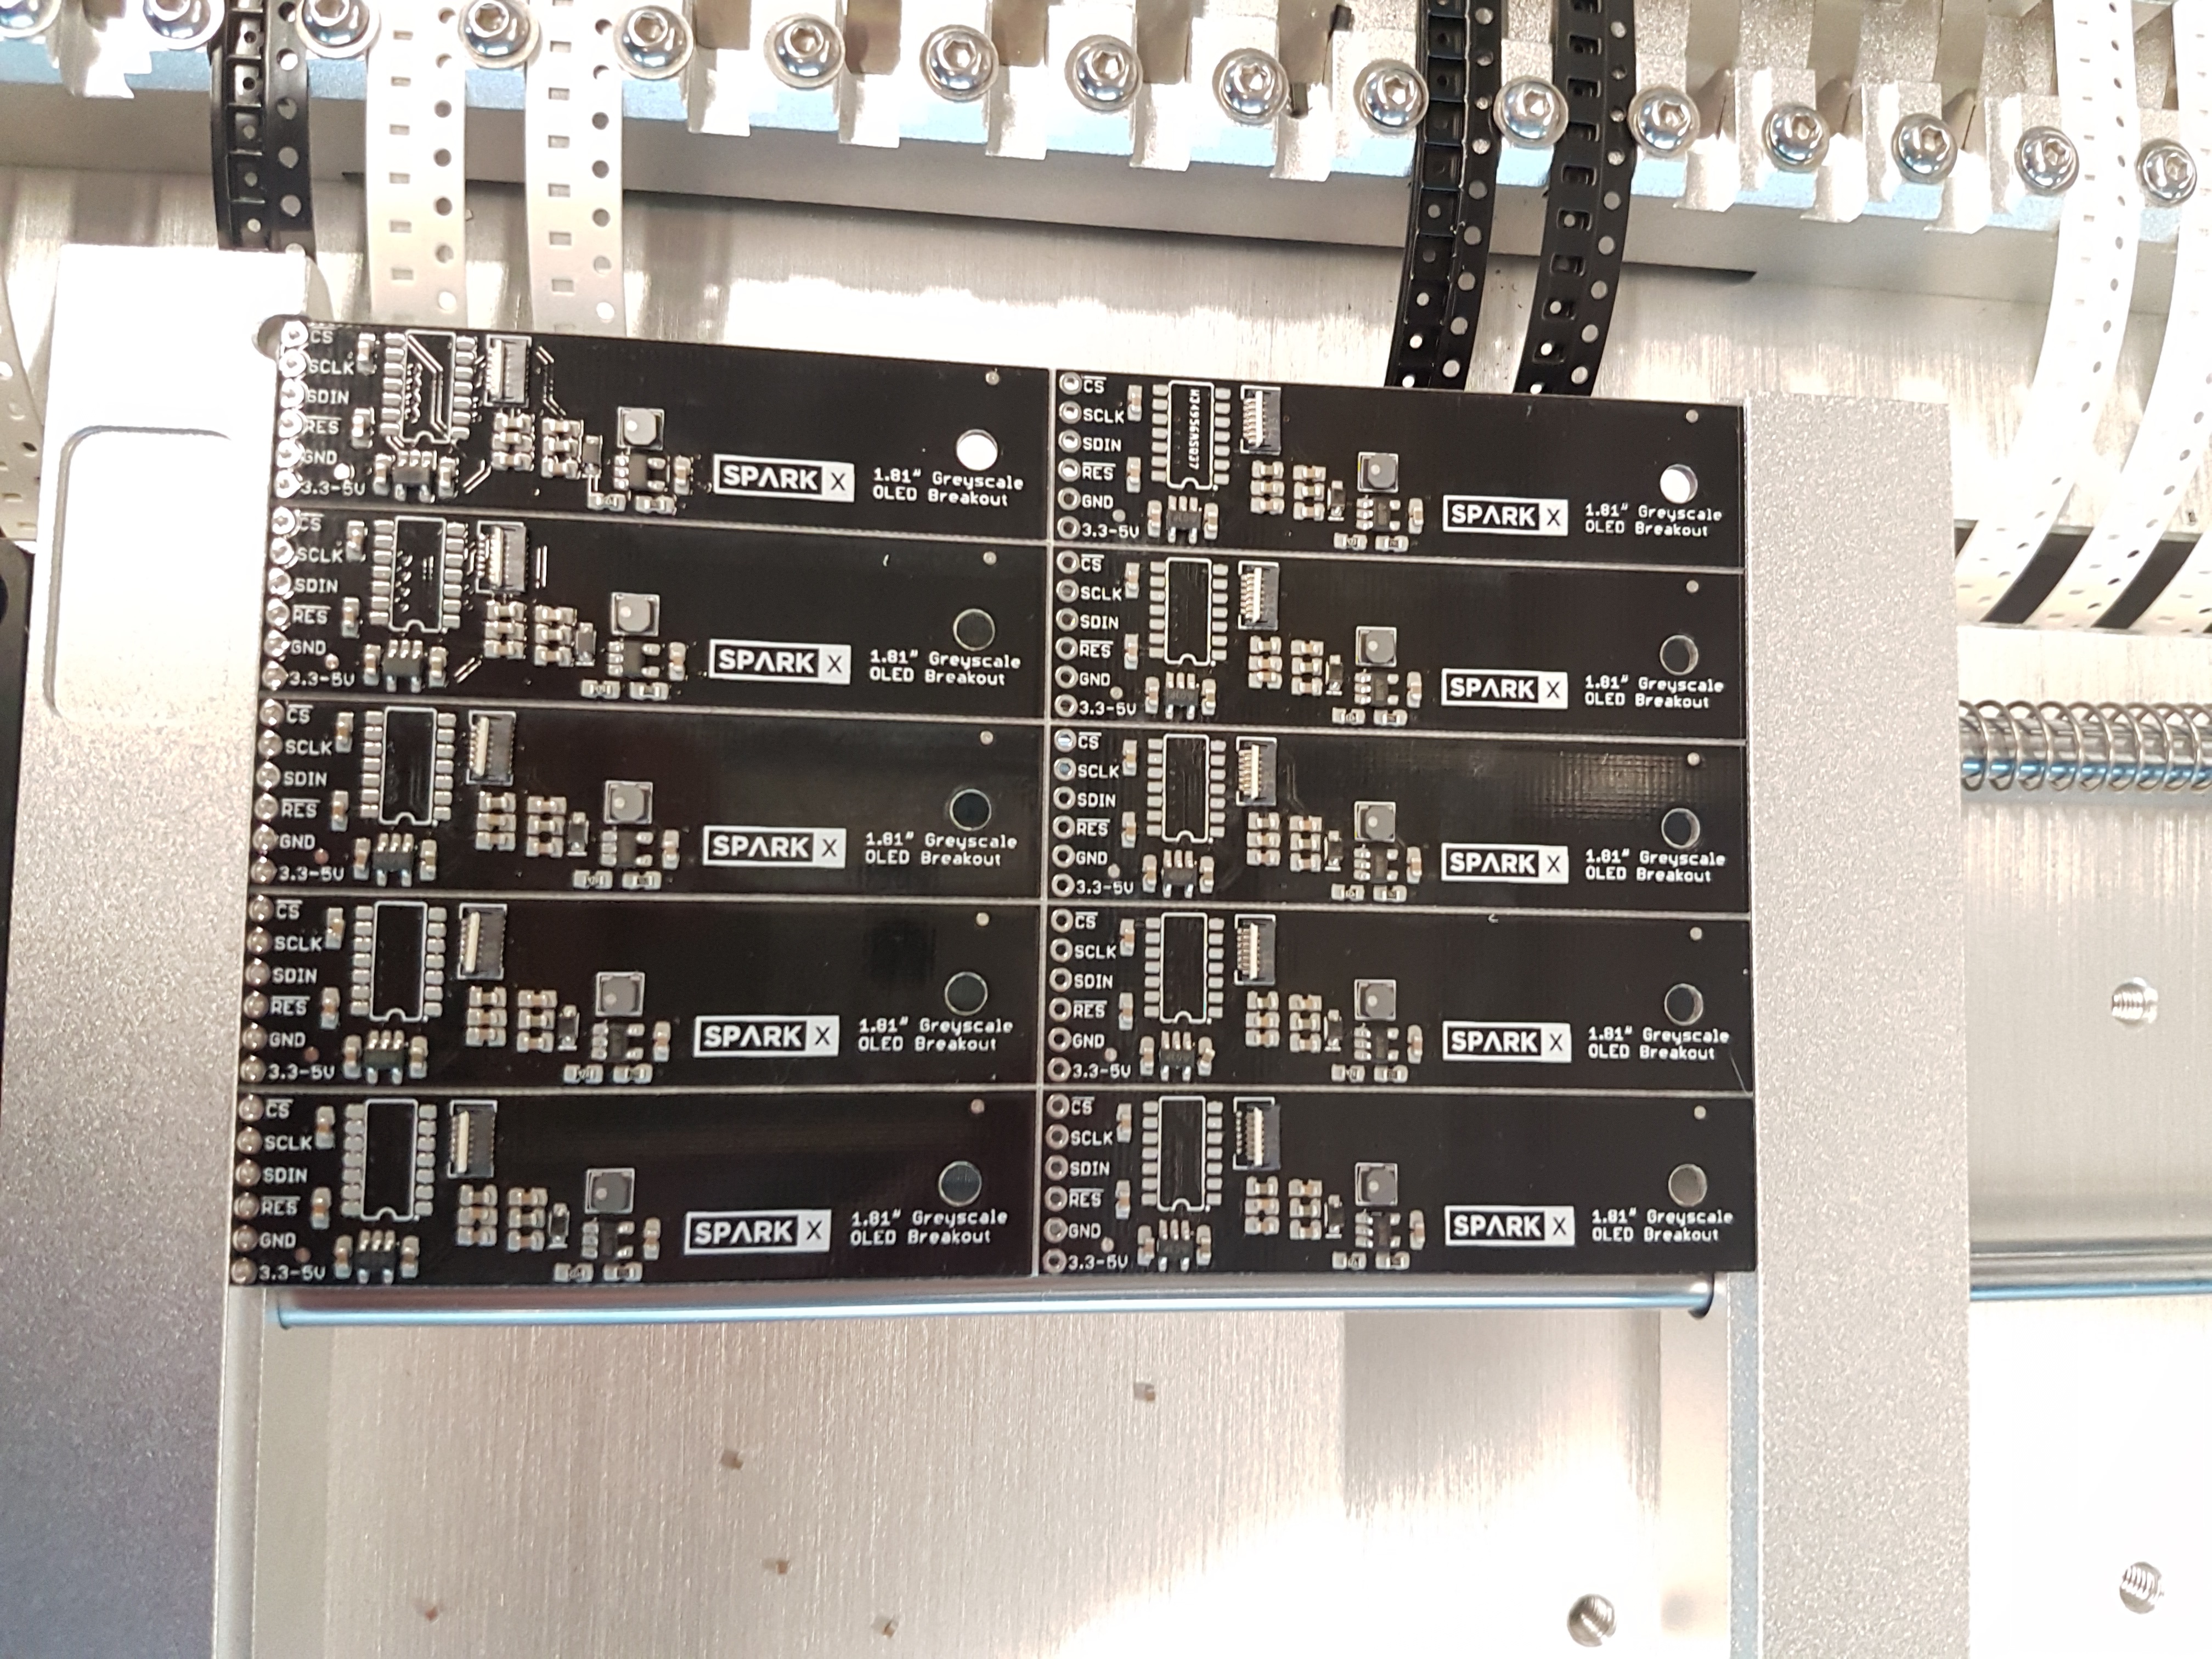
Building Flexible OLED boards
Click on the above image to get a high-res photo. Most of the components are well aligned. The connectors give the vision system a heart attack. And we didn't have the TXB0104 in a tape and reel so we simply hand-placed it (SOICs are easy!).
We’ve been using the CHMT36VA for over a month now and learned all sorts of fun things that we’re going to share in upcoming posts. Overall we’re really happy with the machine. There is a lack of support (it seems problematic across the low-end desktop pick and place category) but we’ve worked hard to create a workflow where we can really build a lot of boards flexibly and quickly.
ReplaceMeOpen
ReplaceMeClose
Why did we choose to go with the CHMT36VA? Well, if you have an hour there is a great discussion on the EEVblog forum of various manufacturers with the biggest one being the Neoden 4 (and a marathon discussion that is 53 pages long). There is no agreement to the discussion but it’s a wealth of opinion and a few data points.
There’s also a handful of good videos floating around youtube:
- Ian Lesnet’s classic review of the TM220A - Basically don’t buy a machine without a vision system.
- Collin O’Flynn had a nice video of the CHMT36VA building ESP32 based boards that really got me interested in the CHMT36VA. Collin also has some great hints and documentation in his CHMT36VA repo.
- This one is just hilarious but it captures how we feel every time the machine does its magic.
- Here is a video of a different machine (TM240A) by our long time friend Brian Schmalz. It shows how similar the various manufacturer’s machines look and how a machine without vision will operate. Note his remark ‘not able to reliably place the CPU’.
- Andrew Kilpatrick’s review was the nail in the coffin for the Neodyn 4 in my eyes. At 7:51 in the video he says the feeders aren’t that great, they are challenging to load, and machine makes mispicks quite often. Why spend ~$10k on a machine when I can have a cheaper machine with less hassle? The CHMT36VA is far from perfect but I can work around the problems.

Let me say that the needs or SparkX are slightly odd. We need to build 10-50 of a design and see how it sells. As it sells we may need to build 100-500pcs. If a design needs more than 500 pieces then it immediately gets moved over to our proper SMD production lines with much more capable machines. SparkX needed something small and quick to setup. After evaluating all the various vendors we decided on the CHMT36VA. It seemed to be the best fit of low-cost and most flexible while being able to get the job done.
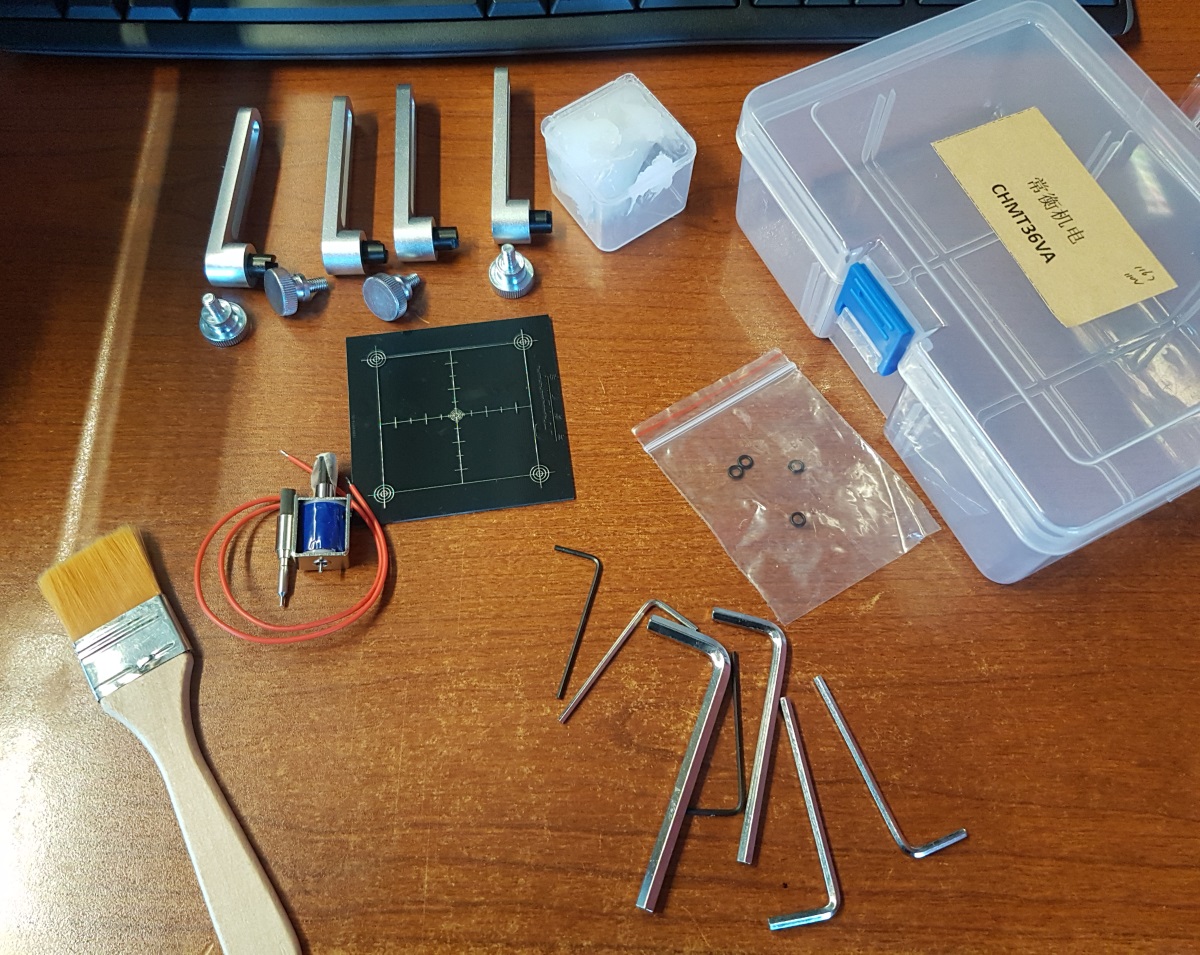
The machine came with a small box of tools, replacement parts, and tray fixtures. We haven’t needed any of them except for the 1.5mm hex key for adjusting the set screws on the tape tensioning wheels.
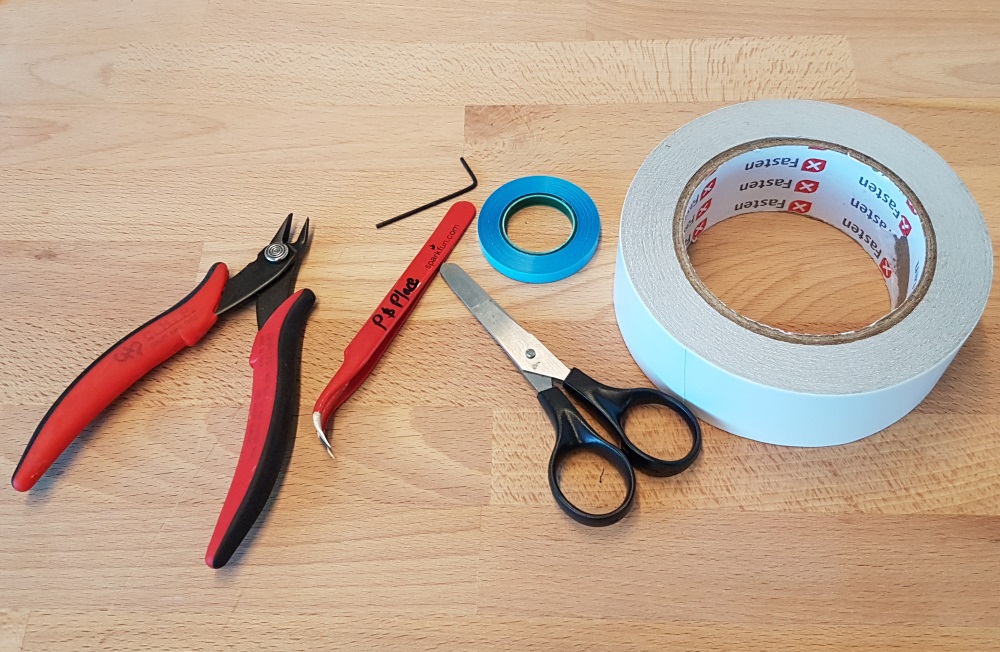
Here are the tools we use all the time and recommend:
- Flush cutters for cutting off tape waste
- 1.5mm hex for adjusting friction set screws on tape retention wheels on feeders
- Curved tweezers for grabbing expensive parts before they fall into the depths of the machine
- Simple scissors for cutt’in stuff
- 1/4” audio splicing tape - we found that this tape is a great, cheap way to add a leader to a cut tape
- Double sided tape is useful for testing the location of a mount. We don’t use it often, rather, we just use paste and step slowly through a work file to verify everything is where it should be, but it’s good to have.
Remember, you do not need a pick and place machine to build electronics. We built over 1,000 SparkX boards in 2017 by hand using nothing but tweezers. It worked fine. A pick and place machine is only needed if you have considerable volume. I’d say the CHMT36VA and the similar desktop pick and place machines are a good fit if you have:
- A single design or a few designs that are limited to ~20 unique parts. It’s crazy how quickly the feeders fill up. Changing feeders is doable but time consuming (~4 minutes for a tape change and another 4 minutes to update build files).
- A design that has a significant number of polarized components like 0603 LEDs, diodes, connectors, etc. Mounting these by hand is especially painful because parts go everywhere when you remove them from their tape.
- A design you need to build around 100 pieces. Setting up a pick and place machine to build 1 board is silly. Setting up the machine to build a panel of 9 is doable. But the sweet spot is ~ 100 copies of the same thing. If you need 5k of something, get a bigger, faster machine or talk to a contract manufacturer.
Pros:
- This machine is just plain fun to setup and run and is mesmerizing to watch. It’s fantastic that we no longer have to place tens of thousands of 4.7k resistors, 0.1uF caps, or Qwiic connectors!
- It’s fast reaching over 2,000 components per hour with vision on. Yes, I know there are lots of much faster machines but when you need to build a couple hundred boards the CPH of a machine is not your bottleneck.
- It works reliably. We still have issues with the webcam cutting out. See quirks below.
- It’s a very common design and should be relatively easy to source replacement parts as they break.
- The machine does not have a built in computer. This means the base cost of the machine is cheaper but you have to provide your own computer. This is a great thing: being able to open the PCB files, output a work file, and immediately start clicking in the Pick and Place software makes setting up a new build very fast and efficient. If you are only building one or two designs then consider one of the machines with the built in computer. But it’s really nice not to have to deal with a built in computer.
- No compressor/vacuum needed, the machine has everything built in. There’s only three cables needed: power, USB for the computer vision, RS232-USB for communication.
Quirks we’ve discovered so far:
- The software is so-so. The main limitation is that you cannot adjust the brightness or contrast of the cameras. The computer vision (CV) system can identify and place 0603s all day long! But if you need to place a connector or QFN you’re going to have significant problems. We’ve added lighting to try to help with the CV but then it fails to identify the 0603s properly. Ideally the software would allow brightness/contrast/light-off settings for each components.
- When the CV does capture a part it can sometimes get the boundary box wrong. We expect to the need to ‘bump’ a few components before reflow on every panel.
- The machine uses two webcams to do the CV and some sort of video multiplexer to swap the feeds to a single USB port. The computer sees just one camera. Nearly every time we start the software the camera feed is not working. We have to power down the machine, shut down the software, unplug then re-plug in the USB cable and start the whole process over again. Remember, it was less than $3500 for a pick and place that used to cost $50k, right?
- The machine has a unique serial number that the software checks at each power on. We didn’t receive our license file when the machine first arrived so that took an extra day to get from the manufacturer.
- I wish I had more feeders! We are already hitting a filled feeder area which means we’re starting to have to swap out feeders. Not the end of the world but I wish I could have the larger CHMT48VB and double the number of feeders. Unfortunately they only (currently) offer this size machine with a built-in computer.
- We originally ordered a tube vibration feeder for $80 that we have not used yet.
- Maximum component height on the CHMT36VA is 5mm. This is because of the geometry of the machine. For some designers this is a deal breaker. For SparkX, 99% of the things we place are under 5mm tall. If we have a really tall electrolytic cap we'll place it by hand.
Thanks for reading! Please checkout the other posts on our desktop pick and place machine.
Do you have one of these machines? Want to share your tips and tricks and ask other owners a question? Join the Desktop Pick and Place google group!
Related Pick and Place Blog Posts:
- Unboxing the $2800 desktop pick and place machine
- Creating a Leader for Cut Tape Components
- Installing the Charm High Software
- A better English Translation for the Charm High Software
- An EAGLE ULP script to create a CHMT36VA work file and start placing components in less than a minute!


Ohh! I want to know more. I almost bought one last year! I have a Chineese reflow oven (T-962A) and I love it so I've been really thinking about the Chinese PnP machines. I currently have a manual pick and place setup with vacuum and tape reel dispensers.
What can we tell you about? We like to share! Be sure to checkout our other posts. I really enjoyed writing the KiCad and Eagle conversion scripts. It's a lot of fun to setup the machine and build stuff when you don't have to train it on each individual part.
Where do I start with my questions =)
Would be nice to automate this build. I've gotten quite fast as hand populating the board with my manual PnP. I can usually stencil and pop the board in 5-6min (34 SMD parts) but when I have to make 100 of them it would be nice to do them automated.
We have used the machine for our WS2812 breakout boards, as Nate mentioned anything that the CV can see clearly can be placed accurately.
Great questions:
J-Lead components: No but plan to and don't suspect any problems. Will report back.
QFN/BGA: We are dialing in QFN issues. Colin has the same machine but no issues. We believe our machine has too much natural light. He has darker room. As long as you can get the bounding box on the part a BGA is possible although I suspect it is pushing the limits of this machine.
The SSOP FT231XS-R shouldn't be too tricky. We've placed the 0.4mm connector from the Flexible OLED display. Again, as long as the CV can pick out the boundary then placing it accurately is not a problem. Mini-USB, not sure.
Great questions! I hope we do some designs in the future where we can answer these questions definitively.
Thanks for the reply and I look forward to reading more about your companies experience with this machine! You can run my esp programmer if you want to try those parts saves me from hand poping one.
Are you guys still liking this machine? Can you give us an update?
We have been liking it. I recommend joining the google group; there's a bunch of folks doing all sorts of fun things with these machines. I have not converted our machine to OpenPNP yet but I think I would if we used it more. We (SparkX) are using the machine about once a month (down from a couple times a week) because we are spoiled and have access to the SparkFun amazing staff and better machines to build our boards. I still think a person with a pair of tweezers is the best solution for <=3 pcs of a board, and this machine is good for 10-1000pcs. It's pretty incredible what some folks are doing with it once they dial in their particular design. The challenge is always the setup time between new designs.
Please do not buy a Charmhigh desktop mounter.
Both Charmhigh and I are located in Changsha, China. We are very close to each other. I drove to Charmhigh to visit the company. They found that the focus of their work in recent years are in the development of 8 and 12 large SMT, desktop SMT has not been updated for about 5 years. Compared with desktop mounters made by other companies in China, you can find that the hardware configuration and software of Charmhigh are rubbish.
Ok, so I have been playing with my "new" chmt36va with varying degrees of success. Not a terrible machine, especially for the price. You can easily buy feeders for other machines that cost more than this entire setup... but I digress.
I use this machine (for now) to produce a very, very simple board that I have in a 5 panel array (1..5) arranged on the X axis with a 3 millimetre space between the boards. I used the cool Sparkfun charm converter to get the data in the machine, and I have had reasonably good luck with it. Some days better than others..
Some things I learned the hard way: 1) you MUST shut off the FIFO buffering in the usb-serial converter that is supplied with the unit. Admittedly I have a slow lap-top running the machine. What was happening with the default USB fifo buffer turned on was that the up-camera would end up taking a picture of the part as it was -moving- into the "center" of the camera. This resulted in it often finding the centroid of the part centimetres away from the "center" of the camera, and causing gross placement errors.
2) sometimes the drag-pin on the feeder just plain misses the component tape, usually at the back of the machine, and continues to do so. I have found that re-starting the software fixes this. WTF? It is workable but a pain in the butt. Is the machine "loosing" steps? somehow I doubt it, becasue it has encoder-feedback -- unless the embedded software sucks. (a possibility)
3) On one of my more fussy days using this machine, I had a hunch that the fiducial offsets don't work right. Turns out, I am pretty sure that they DO NOT work right on penalized boards... let me explain what I have found.. First my setup:
NORMAL setup:
{Mark1}
{ } { } { } { } { } {board1} {board2} {board3} {board4} {board5} { } { } { } { } { }
{mark3} {mark2}
On a “normal” day when you go into the “pcb calibrate” menu and the fiducial are very close. No problem, hit run and all is well. I noted that on some boards, when the fiducals require movement of the head, the boards on the “end” don't seem to line up as well. So, to prove this I performed this experiment, I shifted the entire panel to the right about 1 CM, just slid it over to the right away from its normal corner-circle stop:
Experiment:
<1cm> {Mark1} <1cm> <1cm> <1cm> { } { } { } { } { } <1cm> {board1} {board2} {board3} {board4} {board5} <1cm> { } { } { } { } { } <1cm> <1cm> {mark3} {mark2}
I shifted the boards right 1 cm, and got some very surprising results: the components on Board1 were placed perfectly. The offset was accounted for by the machine, and all was perfect. board 2, was ok, but has a visible shift of the components being placed too far to the right. Board 3 was bad, parts were shifted quite a bit too far to the right. Boards 4 and 5 were totally un-useable. The parts had been “over shifted” too far right and were literally falling off of the board.
So, my question is, has any one else seen this problem? Is there something that I am probably doing wrong?
Here is a link to pictures of the board, and my DPV file..
http://www.mediafire.com/folder/qi2k5n14ldftq/cmt36va_offset_error
Cheers,
---Lou
Hi Lou - Awesome breakdown of the lessons you learned. Thanks!
I recommend you join the Desktop P&P email group. This is the first I've heard of the FIFO trick (I'll try that!). But we have lots of users with various feeder issues that have been solved. The short answer: I've seen the pull advance fail on feeders over time. There are password protect sub menus (we know all the PWs now) that allow you to re-calibrate the needle insertion point. So that should fix your drag-pin issue.
Fidicuals failing: That one I don't have any helpful hints on. We don't use fiducials on the machine, we just align off of components and have pretty good success. I know the group is split between fiducials vs component registration.
Thanks again!
While I am waiting for approval into the Google group, I'm going to ask my question here. I want to know for sure the CHMT36VA will work for my project which can be found at OSH Park here: https://oshpark.com/shared_projects/ZEdG4Qlf. It has a QFN and 27 unique SMTs, several of which are MSOP-10s (.5mm pitch). My thinking is to have a CHMT36VA owner run the project as proof of concept before I buy a machine. If you'd be willing to assist me in my evaluation, I appreciate it greatly! Ken
Hey, is the machine still running after 2 years? How about an update?
Yep. Just ran builds earlier today. Machine is finicky but works well.
There are reports from users on the mailing list of tens of thousands of boards built. They have been really successful.
vol of production is definitely not the only issue! consider placing parts 0402, QFN with exposed pad, EPC2024, GS66508 and plethora of parts which are virtually impossible align with pads & footprints. we found cost of getting our high risk protos so high that it is much more effective to buy & learn one of these gems. Next will be reflow - desktop. Any suggestion will be highly appreciated
Well I went ahead and purchased one of these, the box arrived but now I am having issues even getting the unit to run. Can anyone provide some pointers? It all seems to load but the heads don't move to zero. Basically nothing happens and it sits waiting for a confirm zero. I am not getting any errors like COM or video. Thanks.
Have you tried the Google group linked above?
Hi! I recently purchased a CHMT36VA and am having the same trouble with the camera that you mention in your article. Have you found any fix or work-around? Playing the turn-it-on-and-off game is getting old. In spite of its issues, I still think the machine is pretty awesome. Thanks ahead of time for any feedback you provide. Take care! :)
Join the mailing list! The summary is that a good portion of users (10? 20?) experience the same camera problem. And sadly we haven't found a solution. Power cycling seems to be the only way.
I believe if you join the Google group for the pick and place, all the community-related issues/solutions posted there.
Hi Nate,
If you were looking for an inexpensive ( 20,000 or less ) pick and place to run productions of 1000 pieces at a time, with lots of 0402 size parts which one / brand would you recommend ???
Hi! You should join the mailing list and ask the collective brain. In general folks have had varying degrees of success with 0402s and the CHMT36VA. I personally have not had much luck (the feeder advance seems to fail and advance two every time) but other folks have had plenty of 0402 success.
My company just bought a CHMT48VB and we're a little dissatisfied with the acceleration of the xy-axis. We have it mounted to a sturdy table and also welded X braces across all the legs but the thing still shakes like crazy. Is there any way to adjust the acceleration of the pick head? We've tried reducing the speed to 50%, which helps, but the start-stops of the axis are still fairly violent.
I don't know of a way directly but I recommend joining the desktop pick and place group. There's a handful of CHMT48VB users and someone on the mailing list might know.
Thanks!
Great write up. Can you manually generate a placement file for this machine?
Thanks Nate, Im using easyeda, are you familiar with that layout utility? If you are do you know which of the gerber file could be used to generate a upl file?
Absolutely. The machine was designed for manual assignment of parts. The Eagle to Charm script just makes it less painful.
Thanks Nate, I found the info I needed. Fyi EasyEDA does appear to have a coordinate pnp file that can be generated and exported as a csv. Great write up!
Do you believe the machine to be precise enough for placing 0402 passives as they claim?
While I have not had the need to place 0402s with our machine, yes I think it could with very good success and repeatability. It has the precision, but the accuracy may be a bit rough for 0402s. That said, reflow will take care of a few microns of badness. The question you may want to ask is the machine capable of placing a really tight pitch QFN or BGA. That answer is maybe. We've had success with the machine with good accuracy but we still rely on our larger, more precise machines for BGAs.
Thank you for the insight. BGAs would definitely be a stretch. Just getting the paste deposited well is tricky, and the consequences for rework are high. Its okay to place a critical component or two by hand if the machine can crank out the passives. I would attempt QFN for sure.
How practical would it be to convert this to a bank system, i.e., instead of removing and adding reels one by one, all the reels could be left sitting in place (fully threaded into their guides and tensioning pulleys ready to go) and the whole assembly that they sit on be unscrewed and removed and a new one with different set of reels (also already threaded up ready to go) could be quickly screwed into place? It's a bit hard to see from the photos how easy this part of the machine could be unscrewed from the rest of the machine and whether the tensioning pulley motor belt can be easily removed so it could remain behind or if that would be part of every bank and unplugged/plugged in each time a bank is swapped? Obviously Charmhigh would then have to individually sell the complete removable bank assembly but I doubt they would mind doing that...
Being able to swap entire banks at once would allow rapid switching between making different boards with zero chance of mix-up errors which would allow shorter just-in-time production which should appeal to small businesses.
Nate, not sure if you have solved your SMD recognition problems already, but I found similar issues with SOT-23s, SOT-323s and 0805 caps. I solved my problems by colouring the green plastic parts of the Juki nozzles with a black dry-wipe board marker pen (more matte than a permanent marker and easy to wipe off if needed). Improved the contrast and so far so good with part recognition...
Ohh! Nice. We experimented with that as well. We had enough mixed results we never wrote about it. We have since had lots of problems with CV'ing various components.
A few things:
1) If you have a desktop machine, or just want to discuss these types of machines we've started a google group. Please join it!
2) To encourage you to join the group ;) there is a super secret production calibration sub-menu that will allow you to play with the CV settings. I have not been able to make much headway with getting the CV settings to improve but I'd love your help. We've had enough problems in the recent weeks that we've removed the sharpie (with alcohol).
3) I wondered the other day why P&P machines don't use depth cameras. I assume the P&P world is very slow to change and depth cameras are improving at a staggering rate. But a depth camera could theoretically be much better at detecting the edges of the components (their designed to be flat on the bottom after all). Talking it over at SparkFun we might even be able to pipe a black/white image to the Charm High software and retrofit the machine.
Excellent! Joined! :)
I have also been looking for a pnp machine for a while and found this new one on the market. https://smtcaddy.com looks pretty amazing.
Interesting. I have tried a handful of manual pick and place machines and have never been impressed. Let us know if you get your hands on one of these. I'd rather spend ~$2800 on an automated machine.
Do you think its worth the upgrade for Yamaha feeders if I'm running 8 hours/day?
If I was running that volume I would go with a bigger, better machine with Yamaha feeders. I don't mean to push the CharmHigh company or brand, I'm not a total fan, but their slightly beefer machine, the CHMT530, with Yamaha feeders looks fun.
The CHMT36VA we have works exceptionally well for what we need: 3-5 runs a week, of 50-150 pcs, capable of very flexible breakdown and setup. The CHMT530 is going to be better and faster but may not have the Eagle-to-CharmHigh conversion flexibility that we enjoy.
Is there a way to get this machine to place QFN?
We've had mixed results with SMD devices. We've placed thousands of small leadless packages like the RV-1805 on our RTC board. Worked like a dream.
And then, just yesterday, the machine could not see a SOT-23 to save its life. Very frustrating. We're working on trying to tweak the machine's lighting and vision system but it's very hit or miss.
In general the machine is very capable of placing QFNs. Whether or not the vision system can correctly see it depends on a number of settings that I'm not convinced are exposed to the end user (yes, I realize the absurdity of this statement).
Thanks, I plan to buy an old Juki machine in place of this.
I worry about phoning home if the company goes offline. When phoning home, sniff the packets. I wonder if mother China is sending exactly the same authorization packets back to the device every time? If so it should not be terribly difficult to spoof the DNS on your own network and set up a small server to provide the necessary answer to turn on the machine.
I have not sniffed packets but their software and their machines are designed to run on dedicated, untethered machines. I would be surprised if they rolled a special version of their software for just the non-SBC pick and place machine.
The auth packet you speak of is really just the software requesting a serial number from the machine over the serial port and hashing it against a LICENSE.smt file. We have considered spoofing serial # 0 by injecting serial packets and seeing if the default LICSENSE.smt file would work with it but we haven't had the chance.
SparkFun, this is off topic but how do you do FCC lab testing on your designs with low runs? Do you analyze them in house with a dedicated lab or what? Seems like that would make low runs prohibitively expensive and a loss leader.
We have done a full anechoic chamber test on a handful of products but most of our products require an external micro to use them (and/or ship without firmware) so our products generally fall under the subassemblies exclusion.
What are the PC requirements? The website shows a tiny tablet running software, I'm just wondering if you're using something similar. What is the software like to use? Is it open source or customizable at all? i.e. If I have oddly sized components in a tray, can I make any required changes so it picks them up properly?
Hi Scotty!
We use a way overkill i7 based desktop but that's because it's fairly standard issue SparkFun gear and because we use the same machine to do a variety of 3D modeling, printing, EAGLE PCB manipulation, etc. To run the p&p software itself you could get away with a very light-weight machine.
What is the software like to use? Checkout our other tutorials! You can even download the software and poke at some of the buttons. Installing the software and the better English translation. The software is decidedly closed source, although I am interested in trying out OpenPNP someday.
The machine is capable of picking from trays quite well. It even has a little tray built in so you can put the 'lost' piece from the cut tape into the tray for picking later. Oddly sized components should be ok as long as they are not too heavy for the provided nozzles.
Hi, Can't get ahold of them...wanted to buy one. DO you have a contact you could share?