
Note: This post is a customer story on the benefits of migrating from GitHub to GitLab, by Fabio Akita, a Brazilian Rubyist.
I started evangelizing Git in 2007. It was a very tough sell to make at the time.
Outside of the kernel development almost no one wanted to learn it and we had very worthy competitors, from Subversion, to Mercurial, to Bazaar, to Darcs, to Perforce, and so on. But those of use that dug deeper knew that Git had the edge and it was a matter of time.
Then GitHub showed up in 2008 and the rest is history. For many years it was just "cool" to be in GitHub. The Ruby community drove GitHub up into the sky. Finally it became the status quo and the one real monopoly in information repositories - not just software source code, but everything.
I always knew that we should have a "local" option, which is why I tried to contribute to Gitorious way back in 2009. Other options arose, but eventually GitLab appeared around 2011 and picked up steam in the last couple of years.
GitHub itself raised USD 350 million in funding and one of its required goals is to nail the Enterprise Edition for big corporations that don't want their data outside their closed gardens. Although GitHub hosts every single open source project out there, they are themselves closed-source.
GitLab Inc. started differently with an open source-first approach with their Community Edition (CE) and having both a GitHub-like hosted option as well as a supported Enterprise Edition for fearsome corporations. They already raised USD 5.62 million in funding, and they are the most promising alternative to GitHub so far.
Of course, there are other platforms such as Atlassian's Bitbucket. But I believe Atlassian's strategy is slower and they have a larger suite of enterprise products to sell first, such as Confluence and Jira. I don't think they ever posed much of a competition against GitHub.
GitLab really started accelerating in 2015 as this commit graph shows:
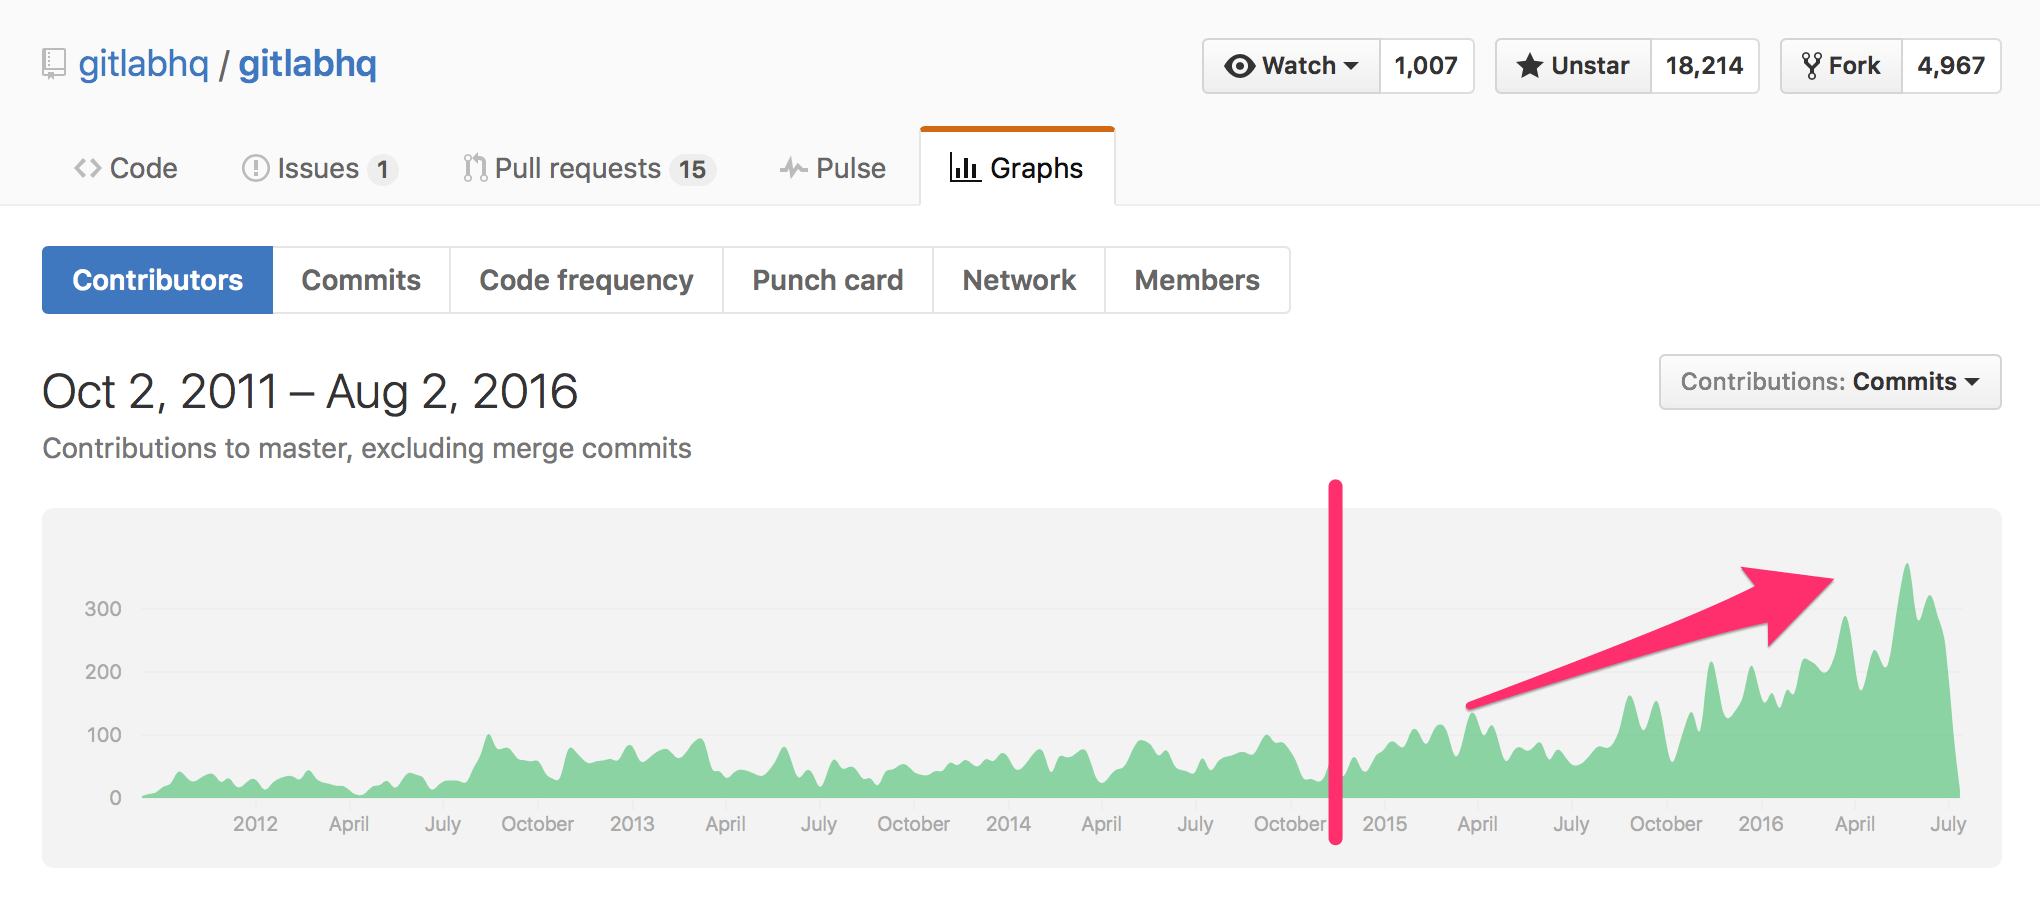
It's been steadily growing since 2011, but they seem to have crossed the first tipping point around late 2014, from early adopters to the early majority. This became more important as GitHub announced their pricing changes in May.
They said they haven't committed to a dead line to enforce the change, so organizations can opt out of the new format for the time being. They are changing from "limited repositories and unlimited users" to "unlimited repositories and limited users".
The Cost-Benefit Conundrum
For example, if you have up to 8 developers in the USD 50/month (20 private repositories), the change won't affect you, as you will pay USD 25/month for 5 users and USD 9 for additional users (total of USD 52/month).
Now, if you have a big team of 100 developers currently in the Diamond Plan of USD 450/month (300 private repositories), you would have to pay USD 25/month + 95 times USD 9, which totals a staggering USD 880/month! Double the amount!
This is an extra USD 10,560 per year!
And what does GitLab affords you instead?
You can have way more users and more repositories in a USD 40/month virtual box (4GB of RAM, 60GB SSD, 4TB transfer).
And it doesn't stop there. GitLab also has very functional GitLab Multi Runner which you can install in a separate box (actually, at least 3 boxes - more on that below).
You can easily connect this runner to the build system over GitLab so every new git push trigger the runner to run the automated test suite in a Docker image of your choosing. So it's a fully functional, full featured Continuous Integration system nicely integrated in your GitLab project interface:
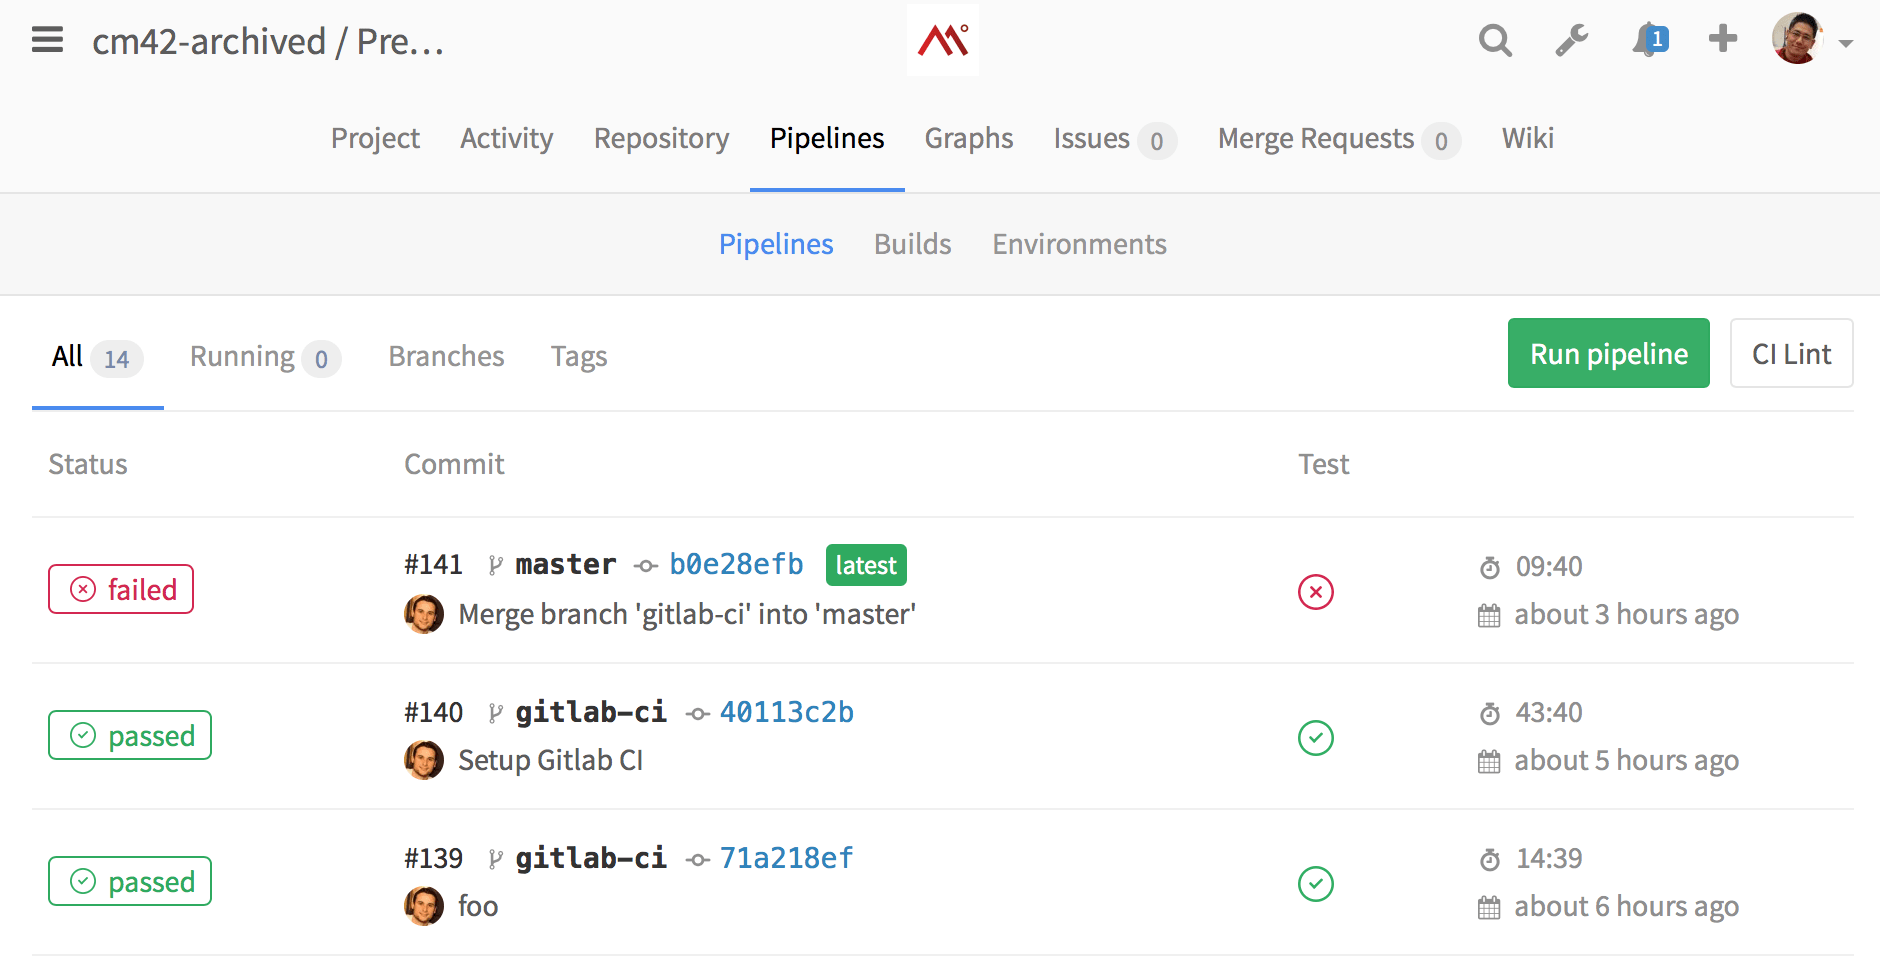
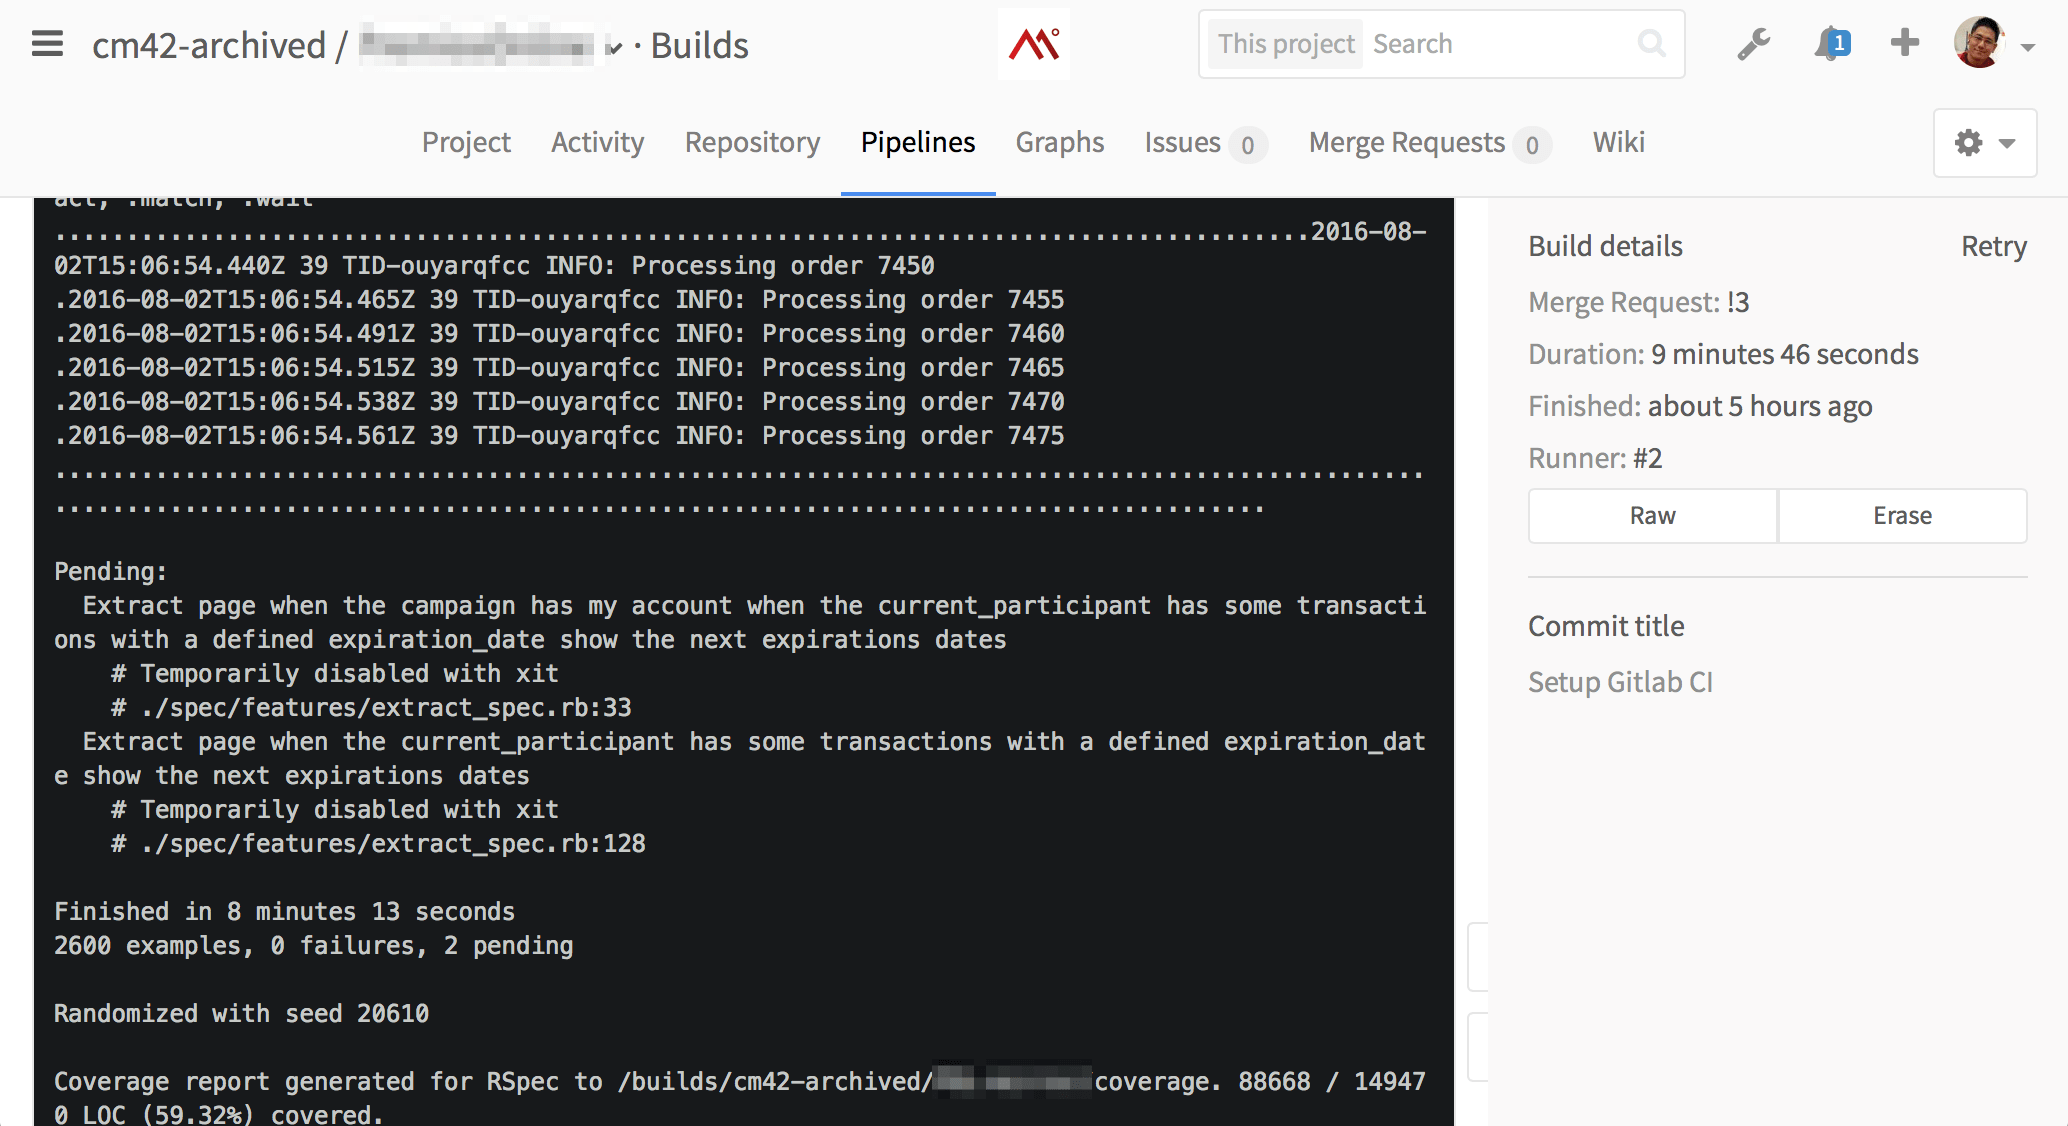
Reminds of you anything? Yep, it's a fully functional alternative to Travis-CI, Semaphore, CircleCI or any other CI you're using with a very easy to install procedure. Let's say you're paying Travis-CI USD 489/month to have 10 concurrent jobs.
You can install GitLab Runner in 3 boxes of USD 10/month (1GB RAM, 1 Cores, 30GB SSD) and have way more concurrent jobs (20? 50? Auto-Scale!?) that runs faster (in a simple test, one build took 15 minutes over Travis took less than 8 minutes at Digital Ocean).
So let's make the math for a year's worth of service. First considering no GitHub plan change:
USD 5,400 (GitHub) + USD 5,868 (Travis) = USD 11,268 a year.
Now, the GitLab + GitLab Runner + Digital Ocean for the same features and unlimited users, unlimited repositories, unlimited concurrent builds:
USD 480 (GitLab) + USD 840 (Runner box) = USD 1,320 a year.
This is already almost 8.5x cheaper with almost no change in quality.
For the worst case scenario, compare it when GitHub decides to enforce the new plans:
USD 10,560 (GitHub new plans) + USD 5,868 (Travis) = USD 16,428
Now the GitLab option is 11x cheaper! You're saving almost USD 15,000 a year! This is not something you can ignore in your cost sheet.
As I said, the calculations above are only significant in a scenario of a 100 developers. You must do your own math taking into account your team size and number of active projects (you can always archive unused projects).
Even if you don't have 100 developers. Let's consider the scenario for 30 developers in the new GitHub per user plans and a smaller Travis configuration for 5 concurrent jobs:
USD 3,000 (GitHub new plan) + USD 3,000 (Travis) = USD 6,000
It's 4.5x cheaper in the Digital Ocean + GitLab suite option.
Heck, let's consider the Current GitHub plan (the Platinum one, for up to 125 repositories):
USD 2,400 (GitHub current plan) + USD 3,000 (Travis) = USD 5,400
Still at least 4x more expensive than a GitLab-based solution!
And how long will it take for a single developer to figure out the set up and migrate everything from GitHub over to the new GitLab installation? I will say that you can reserve 1 week of work for the average programmer to do it following the official documentation and my tips and tricks below.
Installing GitLab CE
I will not bore you with what you can readily find over the Web. I highly recommend you start with the easiest solution first: Digital Ocean's One-Click Automatic Install. Install it in at least a 4GB RAM machine (you will want to keep it if you like it).
Of course, there is a number of different installation options, from AWS AMI images to Ubuntu packages you can install manually. Study the documentation.
It will cost you USD 40 for a month of trial. If you want to save as much as tens of thousands of dollar, this is a bargain.
GitLab has many customization options. You can lock down your private GitLab to allow only users with an official e-mail from your domain, for example. You can configure OAuth2 providers so your users can quickly sign in using their GitHub, Facebook, Google or other accounts.
A Few Gotchas
I've stumbled upon a few caveats in the configuration. Which is why I recommend that you plan ahead - study this entire article ahead of time! -, do a quick install that you can blow away, so you can "feel" the environment before trying to migrate all your repos over to your brand new GitLab. As a reference, this is a part of my /etc/gitlab/gitlab.rb:
# register a domain for your server and place it here:
external_url "http://my-gitlab-server.com/"

# you will want to enable [LFS](https://git-lfs.github.com)
gitlab_rails['lfs_enabled'] = true

# register your emails
gitlab_rails['gitlab_email_from'] = "[email protected]"

# add your email configuration (template for gmail)
gitlab_rails['smtp_enable'] = true
gitlab_rails['smtp_address'] = "smtp.gmail.com"
gitlab_rails['smtp_port'] = 587
gitlab_rails['smtp_user_name'] = "-- some no-reply email ---"
gitlab_rails['smtp_password'] = "-- the password ---"
gitlab_rails['smtp_domain'] = "my-gitlab-server.com"
gitlab_rails['smtp_authentication'] = "login"
gitlab_rails['smtp_enable_starttls_auto'] = true
gitlab_rails['smtp_openssl_verify_mode'] = 'peer'

# this is where you enable oauth2 integration
gitlab_rails['omniauth_enabled'] = true

# CAUTION!
# This allows users to login without having a user account first. Define the allowed providers
# using an array, e.g. ["saml", "twitter"], or as true/false to allow all providers or none.
# User accounts will be created automatically when authentication was successful.
gitlab_rails['omniauth_allow_single_sign_on'] = ['github', 'google_oauth2', 'bitbucket']
gitlab_rails['omniauth_block_auto_created_users'] = true

gitlab_rails['omniauth_providers'] = [
  {
    "name" => "github",
    "app_id" => "-- github app id --",
    "app_secret" => "-- github secret --",
    "url" => "https://github.com/",
    "args" => { "scope" => "user:email" }
  },
  {
    "name" => "google_oauth2",
    "app_id" => "-- google app id --",
    "app_secret" => "-- google secret --",
    "args" => { "access_type" => "offline", "approval_prompt" => '', hd => 'codeminer42.com' }
  },
  {
    "name" => "bitbucket",
    "app_id" => "-- bitbucket app id --",
    "app_secret" => "-- bitbucket secret id --",
    "url" => "https://bitbucket.org/"
  }
]

# if you're importing repos from GitHub, Sidekiq workers can grow as high as 2.5GB of RAM and the default [Sidekiq Killer](https://docs.gitlab.com/ee/operations/sidekiq_memory_killer.html) config will cap it down to 1GB, so you want to either disable it by adding '0' or adding a higher limit
gitlab_rails['env'] = { 'SIDEKIQ_MEMORY_KILLER_MAX_RSS' => '3000000' }
There are dozens of default variables you can override, just be careful on your testings.
Every time you change a configuration, you can just run the following commands:
sudo gitlab-ctl reconfigure
sudo gitlab-ctl restart
You can open a Rails console to inspect production objects like this:
gitlab-rails console
I had a lot of trouble importing big repos from GitHub, but after a few days debugging the problem with GitLab Core Team developers Douglas Alexandre, Gabriel Mazetto, a few Merge Requests and some local patching and I was finally able to import relatively big projects (more than 5,000 commits, more than 1,000 issues, more than 1,200 pull requests with several comments worth of discussion threads). A project of this size can take a couple of hours to complete, mainly because it's damn slow to use GitHub's public APIs (they are slow and they have rate limits and abuse detection, so you can't fetch everything as fast as your bandwidth would allow).
(By the way, don't miss GitLab will be over at Rubyconf Brazil 2016, on Sep 23-24)
Migrating all my GitHub projects took a couple of days, but they all went through smoothly and my team didn't have any trouble, just adjusting their git remote URLs and they're done.
The import procedure from GitHub is quite complete, it brings not only the git repo per se, but also all the metadata, from labels to comments and pull request history - which is the one that usually takes more time.
But I'd recommend waiting for at least version 8.11 (it's currently 8.10.3) before trying to import large GitHub projects.
If you're on Bitbucket, unfortunately there are less features in the importer. It will mostly just bring the source code. So be aware of that if you extensively depend on their pull request system and you want to preserve this history. More feature will come and you can even help them out, they are very resourceful and willing to make GitLab better.
Side-track: Customizations for every Digital Ocean box
Assume that you should run what's in this section for all new machines you create over Digital Ocean.
First of all, they come without a swap file. No matter how much RAM you have, the Linux OS is meant to work better by combining a swap file. You can read more about it later, for now just run the following as root:
fallocate -l 4G /swapfile
chmod 600 /swapfile
mkswap /swapfile
swapon /swapfile

sysctl vm.swappiness=10
sysctl vm.vfs_cache_pressure=50
Edit the /etc/fstab file and add this line:
/swapfile none swap sw 0 0
Don't forget to set the default locale of your machine. Start by editing the /etc/environment file and adding:
LC_ALL=en_US.UTF-8
LANG=en_US.UTF-8
Then run:
sudo locale-gen en_US en_US.UTF-8
sudo dpkg-reconfigure locales
Finally, you should have Ubuntu automatically install stable security patches for you. You don't want to forget machines online without the most current security fixes, so just run this:
sudo dpkg-reconfigure --priority=low unattended-upgrades
Choose "yes" and you're done. And of course, for every fresh install, it's always good to run the good old:
sudo apt-get update && sudo apt-get upgrade
This is the very basics, I believe it's easier to have an image with all this ready, but if you use the standard Digital Ocean images, these settings should do the trick for now.
Installing the CI Runner
Once you finish your GitLab installation, it's super easy to deploy the GitLab Runner. You can use the same machine but I recommend you install it in a separate machine.
If you don't know what a runner is, just imagine it like this: It's basically a server connected to the GitLab install. When it's available and online, whenever someone pushes a new commit, merge request, to a repository that has a gitlab-ci-yml file present, GitLab will push a command to the runner.
Depending on how you configured the runner, it will receive this command and spawn a new Docker container. Inside the container it will execute whatever you have defined in the gitlab-ci.yml file in the project. Usually it's fetching cached files (dependencies, for example), and run your test suite.
In the most basic setup, you will only have one Runner and any subsequent builds from other users will wait in line until they finish. If you've used external CI services such as Travis-CI or CircleCI, you know that they charge for some number of concurrent builds. And it's very expensive.
The less concurrent builds available, the more your users will have to wait for feedback on their changes, and less productive you will become. People may even start to avoid adding new tests, or completely ignore the tests, which will really hurt the quality of your project over time. If there is one thing you must not do is not having good automated test suites.
Gabriel Mazetto pointed me to a very important GitLab CI Runner feature: auto-scaling. This is what they use in their hosted offering over at GitLab.com.
You can easily set up a runner that can use "docker-machine" and your IaaS provider APIs to spin up machines on the fly to run as many concurrent builds as you want, and it will be super cheap!
For example, on Digital Ocean you can be charged USD 0.06 (6 cents) per hour of usage of a 4GB machine. Over at AWS EC2 you can be charged USD 0.041 per hour for an m3.medium machine.
There is extensive documentation but I will try to summarize what you have to do. For more details I highly recommend you to study their official documentation.
Start by creating 3 new machines at Digital Ocean, all in the same Region with private networking enabled! I will list a fake private IP address just for the sake of advancing in the configuration examples:
- a 1GB machine called "docker-registry-mirror", (ex 10.0.0.1)
- a 1GB machine called "ci-cache", (ex 10.0.0.2)
- a 1GB machine called "ci-runner", (ex 10.0.0.3)
Yeah, they can be small as very little will run on them. You can be conservative and choose the 2GB RAM options just to be on the safe side (and pricing will still be super cheap).
Don't forget to execute the basic configuration I mentioned above to enable a swapfile, auto security update and locale regeneration.
SSH in to "docker-registry-mirror" and just run:
docker run -d -p 6000:5000 \
    -e REGISTRY_PROXY_REMOTEURL=https://registry-1.docker.io \
    --restart always \
    --name registry registry:2
Now you will have a local Docker images registry proxy and cache at 10.0.0.1:6000 (take note of the real private IP).
SSH in to "ci-cache" and run:
mkdir -p /export/runner

docker run -it --restart always -p 9005:9000 \
        -v /.minio:/root/.minio -v /export:/export \
        --name minio \
        minio/minio:latest /export
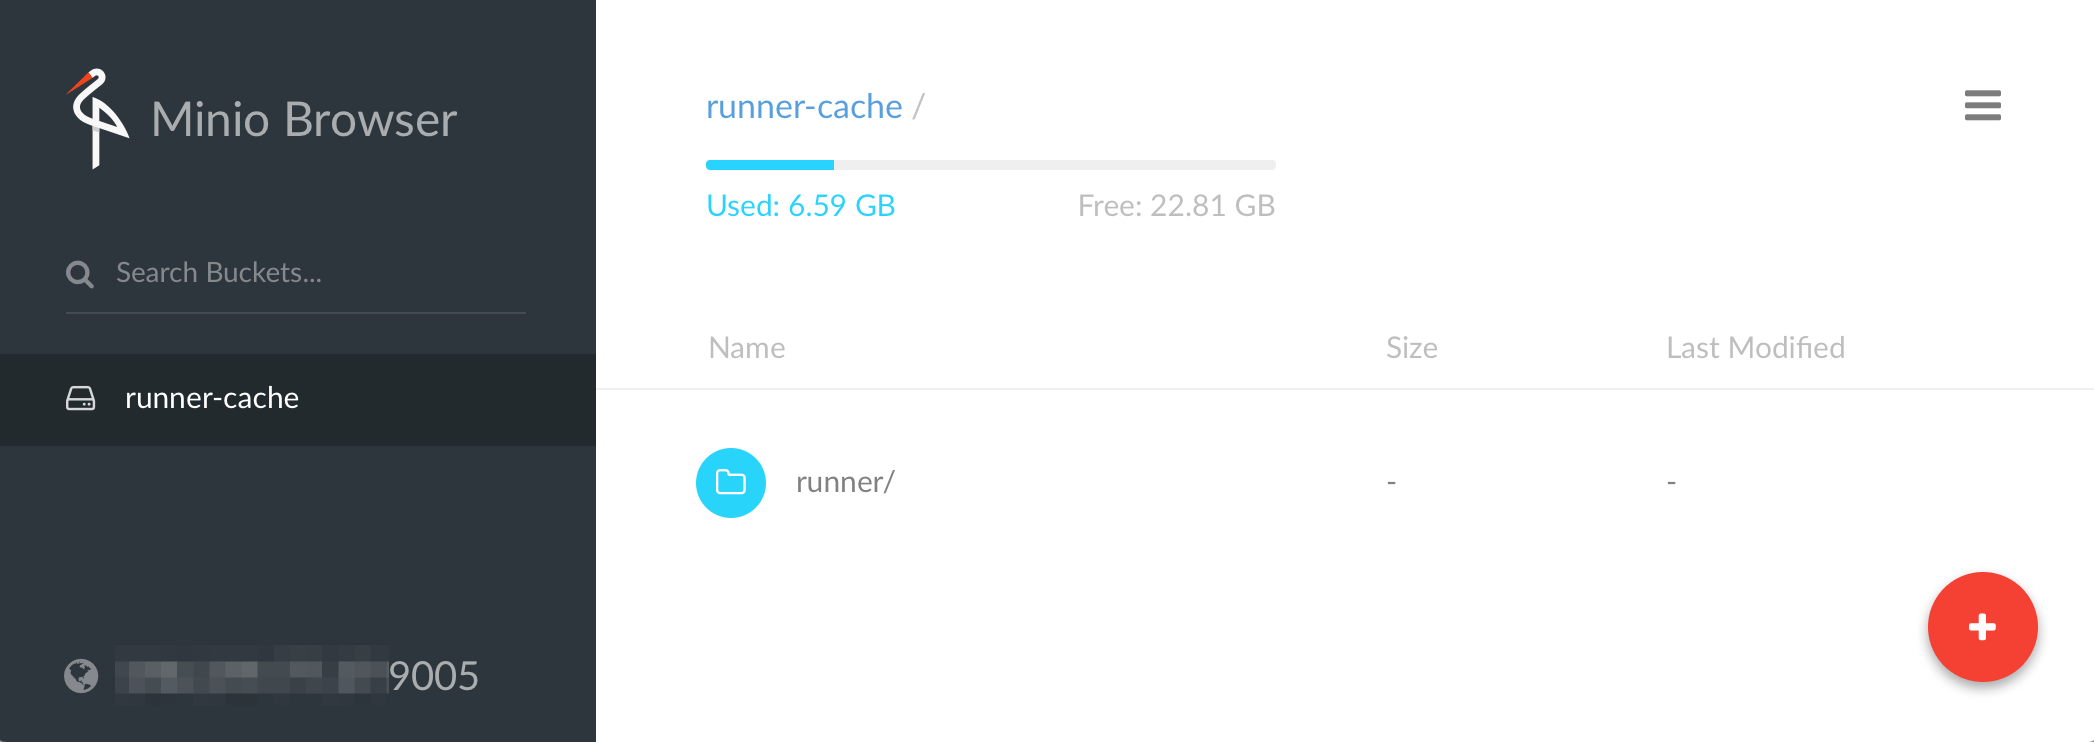
Now you will have an AWS S3 clone called Minio running. I didn't know this project even existed, but it is a nifty little service written in Go to clone the AWS S3 behavior and APIs. So now you can have your very own S3 inside your infrastructure!
After Docker spin ups, it will print out the Access Key and Secret keys, make notes. And this service will be running at 10.0.0.2:9005.
You can even open a browser and see their web interface at http://10.0.0.2:9005 and use the access and secret keys to login. Make sure you have a bucket named "runner". The files will be stored at the /export/runner directory.
Make sure the bucket name is valid (it must be a valid DNS naming, for example, DO NOT use underlines).
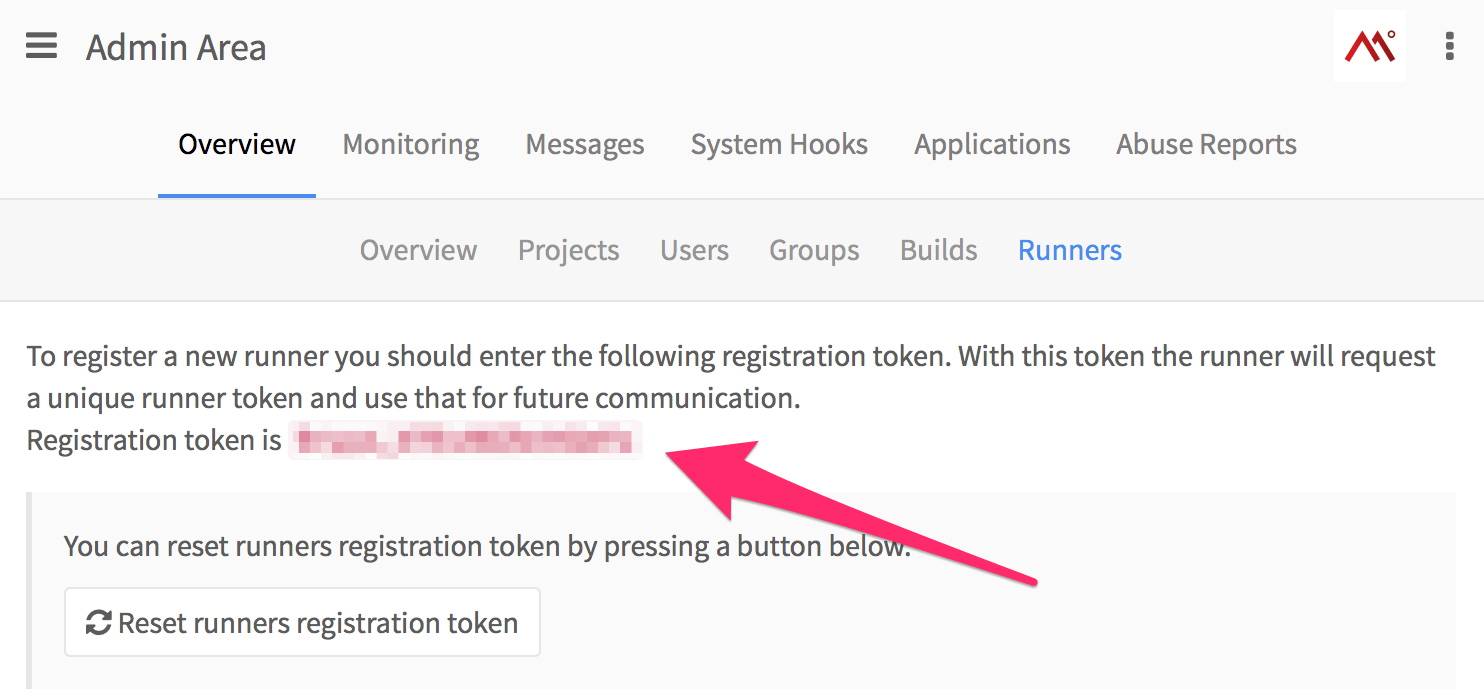
Open this URL from your freshly installed GitLab CE: http://yourgitlab.com/admin/runners and take note of the Registration Token. Let's say it's 1aaaa_Z1AbB2CdefGhij
Finally, SSH in to "ci-runner" and run:
curl -L https://github.com/docker/machine/releases/download/v0.7.0/docker-machine-`uname -s`-`uname -m` > /usr/local/bin/docker-machine

chmod +x /usr/local/bin/docker-machine

curl -L https://packages.gitlab.com/install/repositories/runner/gitlab-ci-multi-runner/script.deb.sh | sudo bash

sudo apt-get install gitlab-ci-multi-runner

rm -Rf ~/.docker # just to make sure
Now you can register this new runner with your GitLab install, you will need the Registration Token mentioned above.
sudo gitlab-ci-multi-runner register
You will be asked a few questions, and this is what you can answer:
Please enter the gitlab-ci coordinator URL (e.g. https://gitlab.com/ci )
https://yourgitlab.com/ci
Please enter the gitlab-ci token for this runner
1aaaa_Z1AbB2CdefGhij # as in the example above
Please enter the gitlab-ci description for this runner
my-autoscale-runner
INFO[0034] fcf5c619 Registering runner... succeeded
Please enter the executor: shell, docker, docker-ssh, docker+machine, docker-ssh+machine, ssh?
docker+machine
Please enter the Docker image (eg. ruby:2.1):
codeminer42/ci-ruby:2.3
INFO[0037] Runner registered successfully. Feel free to start it, but if it's
running already the config should be automatically reloaded!
Let's make a copy of the original configuration, just to be safe:
cp /etc/gitlab-runner/config.toml /etc/gitlab-runner/config.bak
Copy the first few lines of this file (you want the token), it will look like this:
concurrent = 1
check_interval = 0

[[runners]]
  name = "my-autoscale-runner"
  url = "http://yourgitlab.com/ci"
  token = "--- generated runner token ---"
  executor = "docker+machine"
The important part here is the "token". You will want to take note of it. And now you also will want to create a new API Token over at Digital Ocean. Just Generate a New Token and take note.
You can now replace the entire config.toml file for this:
concurrent = 20
check_interval = 0

[[runners]]
  name = "my-autoscale-runner"
  url = "http://yourgitlab.com/ci"
  token = "--- generated runner token ---"
  executor = "docker+machine"
  limit = 15
  [runners.docker]
    tls_verify = false
    image = "codeminer42/ci-ruby:2.3"
    privileged = false
  [runners.machine]
    IdleCount = 2                   # There must be 2 machines in Idle state
    IdleTime = 1800                 # Each machine can be in Idle state up to 30 minutes (after this it will be removed)
    MaxBuilds = 100                 # Each machine can handle up to 100 builds in a row (after this it will be removed)
    MachineName = "ci-auto-scale-%s"   # Each machine will have a unique name ('%s' is required)
    MachineDriver = "digitalocean"  # Docker Machine is using the 'digitalocean' driver
    MachineOptions = [
        "digitalocean-image=coreos-beta",
        "digitalocean-ssh-user=core",
        "digitalocean-access-token=-- your new Digital Ocean API Token --",
        "digitalocean-region=nyc1",
        "digitalocean-size=4gb",
        "digitalocean-private-networking",
        "engine-registry-mirror=http://10.0.0.1:6000"
    ]
  [runners.cache]
    Type = "s3"   # The Runner is using a distributed cache with Amazon S3 service
    ServerAddress = "10.0.0.2:9005"  # minio
    AccessKey = "-- your minio access key --"
    SecretKey = "-- your minio secret key"
    BucketName = "runner"
    Insecure = true # Use Insecure only when using with Minio, without the TLS certificate enabled
And you can restart the runner to pick up the new configuration like this:
gitlab-ci-multi-runner restart
As I said before, you will want to read the extensive official documentation (and every link within).
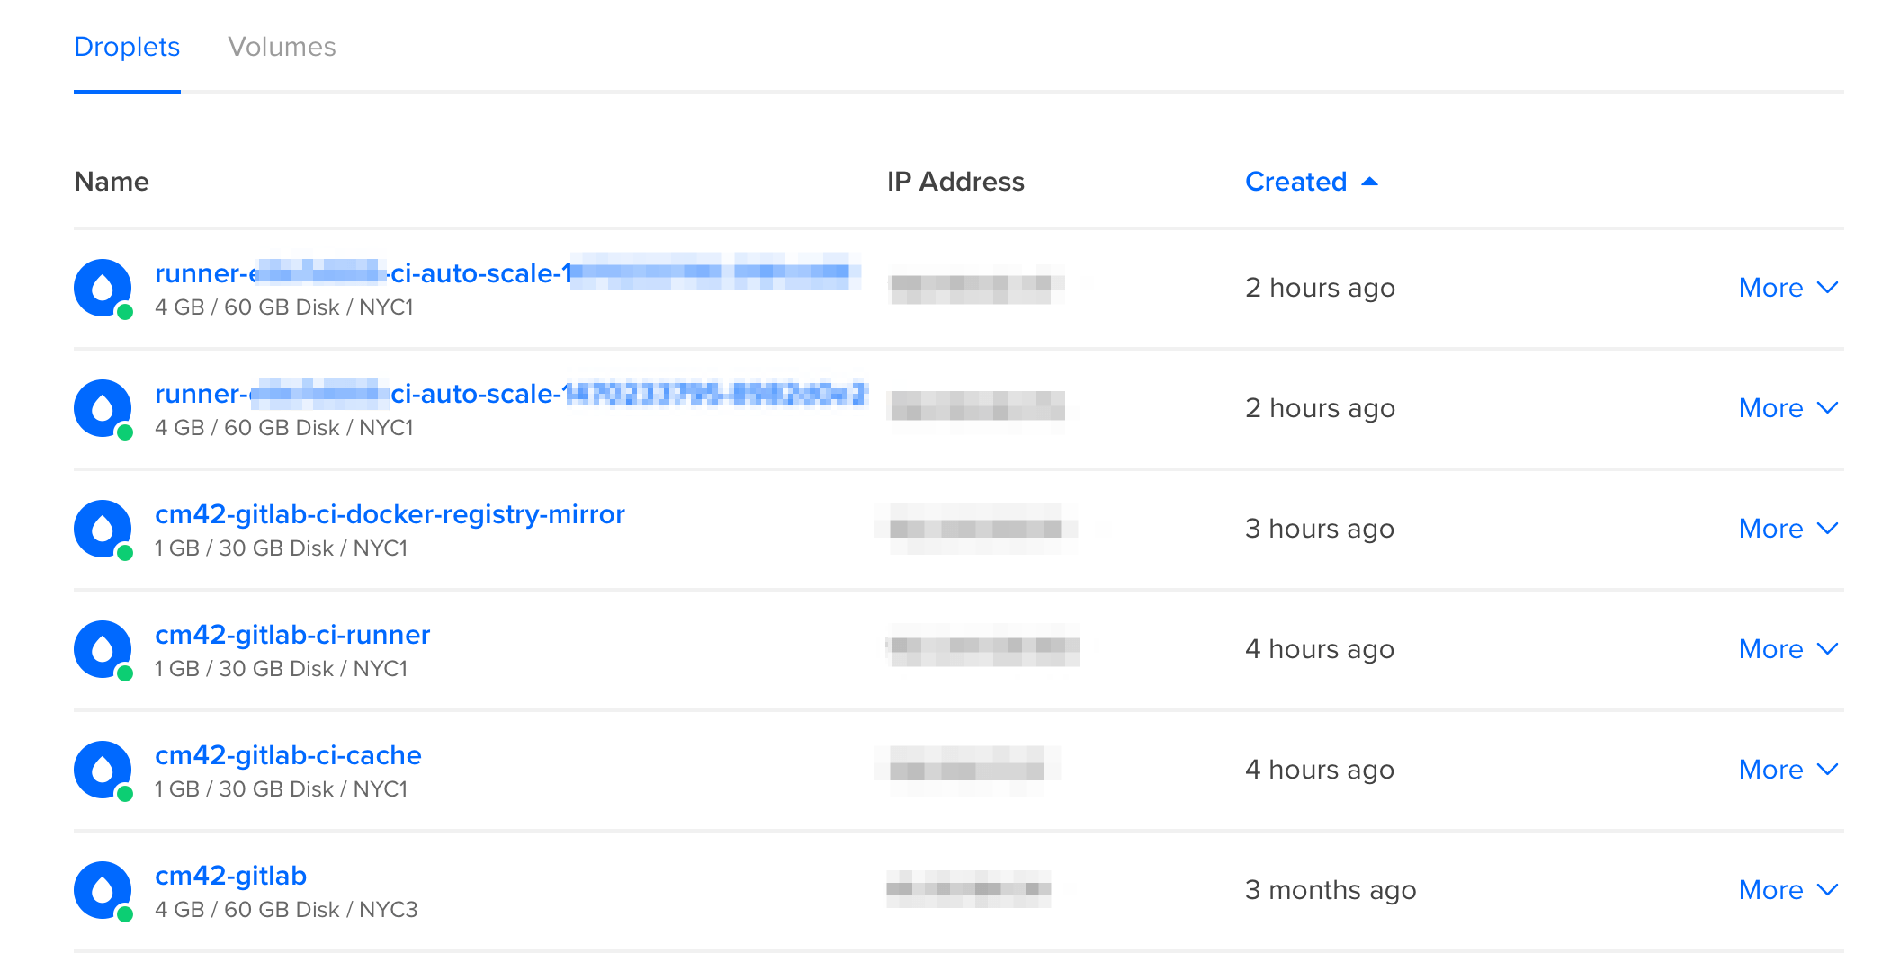
If you did everything right, changing the correct private IPs for the docker registry and cache, the correct tokens, and so forth, you can log in to your Digital Ocean dashboard and you will see something like this:
And from the ci-runner machine, you can list them like this:
# docker-machine ls

NAME                                    ACTIVE        DRIVER   STATE     URL            SWARM   DOCKER    ERRORS
runner-xxxx-ci-auto-scale-xxxx-xxxx  -  digitalocean  Running  tcp://191.168.0.1:237    v1.10.3
runner-xxxx-ci-auto-scale-xxxx-xxxx  -  digitalocean  Running  tcp://192.169.0.2:2376   v1.10.3
They should not list any errors, meaning that they are up and running, waiting for new builds to start.
There will be 2 new machines listed in your Digital Ocean dashboard, named "runner-xxxxx-ci-auto-scale-xxxxx". This is what IdleCount = 2 does. If they stay idle for more than 30 minutes (IdleTime = 1800) they will be shut down so you don't get charged.
You can have several "runner" definitions, each with a limit of builds/machines that can be spawned in Digital Ocean. You can have other runner definitions for other providers, for example. But in this example we are limited to at most 15 machines, so 15 concurrent builds.
The concurrent limit is a global setting. So if I had 3 runner definitions, each with a limit of 15, they would still be globally limited to 20 as defined in the concurrent global variable.
You can use different providers for specific needs, for example, to run macOS builds or Raspberry Pi builds or other exotic kinds of builds. In the example I am keeping it simple and just setting many builds in the same provider (Digital Ocean).
And don't worry about the monthly fee for each machine. When used in this manner, you will be paying per hour.
Also, make sure you spun up all your machines (docker-registry, minio cache, CI runner) all with private networking enabled (so they talk through the internal VLAN instead of having to go all the way through the public internet) and that they are all in the same region data center (NYC1 is New York 1 - New York has 3 sub-regions, for example). Don't start machines in different regions.
Because we have Docker proxy/cache and Minio/S3 cache, your builds will take longer the first time (let's say, 5 minutes), and then subsequent build will fetch everything from the cache (taking, let's say, 1:30 minute). It's fast and it's convenient.
Setting up each Project for the Runner
The Runner is one of the newest pieces of the GitLab ecosystem so you might have some trouble at first to figure out a decent configuration. But once you have the whole infrastructure figured out as described in the previous section, now it's as easy as adding a .gitlab-ci.yml file to your root directory. Something like this:
# This file is a template, and might need editing before it works on your project.
image: codeminer42/ci-ruby:2.3

# Pick zero or more services to be used on all builds.
# Only needed when using a docker container to run your tests in.
# Check out: https://docs.gitlab.com/ee/ci/docker/using_docker_images.html#what-is-service
services:
  - postgres:latest
  - redis:latest

cache:
  key: your-project-name
  untracked: true
  paths:
    - .ci_cache/

variables:
  RAILS_ENV: 'test'
  DATABASE_URL: postgresql://postgres:@postgres
  CODECLIMATE_REPO_TOKEN: -- your codeclimate project token --

before_script:
  - bundle install --without development production -j $(nproc) --path .ci_cache
  - cp .env.sample .env
  - cp config/database.yml.example config/database.yml
  - bundle exec rake db:create db:migrate

test:
  script:
    - xvfb-run bundle exec rspec
My team at Codeminer 42 prepared a simple Docker image with useful stuff pre-installed (such as the newest phantomjs, xvfb, etc), so it's now super easy to enable automated builds within GitLab by just adding this file to the repositories. (Thanks to Carlos Lopes, Danilo Resende and Paulo Diovanni - who will be talking about Docker at Rubyconf Brasil 2016, by the way).
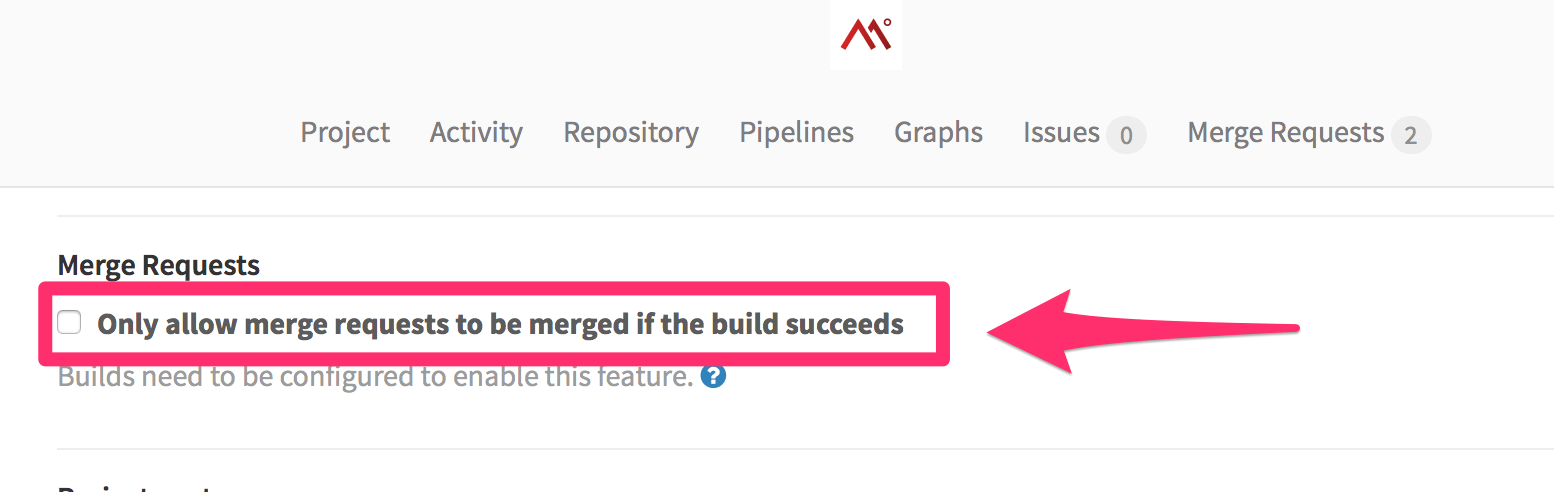
GitLab CI even supports building a pending Merge Request, and you can enforce the request so it can only be merged if builds pass, just like in GitHub + Travis. And as Code Climate is agnostic to Repository host or CI runner, you can easily integrate it as well.
Conclusion
The math is hard to argue against: the GitLab + GitLab CI + Digital Ocean combo is a big win. GitLab's interface is very familiar so users from GitHub or Bitbucket will feel quite at home in no time.
We can use all the Git flows we're used to.
GitLab CE is still a work in progress though, the team is increasing their pace but there are currently more than 4,200 open issues. But as this is all Ruby on Rails and Ruby tooling, you can easily jump in and contribute. No contribution is too small. Just by reporting how to reproduce a bug is help enough to assist the developers to figure out how to improve faster.
But don't shy away because of the open issues, it's fully functional as of right now and I have not found any bugs that could be considered show stoppers.
They have many things right. First of all, it's a "simple" Ruby on Rails project. It's a no-thrills front-end with plain JQuery. The choice of HAML for the views is questionable but it doesn't hurt. They use good old Sidekiq+Redis for asynchronous jobs. No black magic here. A pure monolith that's not difficult to understand and to contribute.
The APIs are all written using Grape. They have the GitLab CE project separated from other components, such as the GitLab Shell and GitLab CI Multi-Runner.
They also forked Omnibus in order to be able to package the CE Rails project as a ".deb". Everything is orchestrated with Docker. And when a new version is available, you only need to apt-get update && apt-get upgrade and it will do all the work of backing up and migrating Postgresql, updating the code, bundling in new dependencies, restarting the services and so forth. It's super convenient and you should take a look at this project if you have complicated Rails deployments into your own infrastructure (out of Heroku, for example).
I am almost done moving hundreds of repositories from both Bitbucket and GitHub to GitLab right now and the developers from my company are already using it in a daily basis without any problems. We are almost at the point where we can disengage from Bitbucket, GitHub and external CIs.
You will be surprised how easy your company can do it too and save a couple thousand dollars in the process, while having fun doing it!
Note: this article was originally posted by AkitaOnRails.